Not just another love song

| 0 comments |


(Cross-posted on the Google Australia Blog.)

Collaboration lies at the heart of Google for Work. It helps people work together and achieve great things; not just for work, but also for society.

That’s why, as Australia celebrates Mardi Gras this week, we teamed up with local nonprofit Twenty10 to raise awareness of homophobia and transphobia by creating a nationwide musical collaboration.

We went to a community day, opened a blank Google Doc, and asked people to help us write a love song. More than 1,000 people added their own lyrics, as did well-known local musicians Guy Sebastian, Megan Washington and the Jezabels.
Google volunteer Tom van Gessel collects another love song lyric

As the lyrics came through on the Doc from multiple locations and devices, Toby Martin, a local singer-songwriter, chose his favorite lyrics and turned them into a beautiful song, which he performed at the end of the day.

Watch the story of the collaboration here:

You can download the song for free on Google Play. For every time it’s downloaded until Mardi Gras ends, we’ll donate $1 to Twenty10 (up to $50,000)

As Toby sings, love is for everyone.

Read More..

Local WebServer – Apache Tomcat

| 0 comments |

Pre-requisites: You should have Apache Tomcat installed on your machine, downloadable from http://tomcat.apache.org/download-60.cgi and you should have eclipse 3.6 on your machine
Configure the webserver to be used within eclipse as follows:

1.       Unzip the download into your local directory
2.       Tell Eclipse about Tomcat

First, start Eclipse and go to the Workbench as shown in the previous section. Then, click on Servers tab at bottom. R-click, New, Server, Apache, Tomcat v6.0, navigate to folder, OK. You should now see "Tomcat v6.0 Server at localhost" listed under the Servers tab at the bottom.
 

3. Run Tomcat.
Click on Servers tab at bottom. R-click on Tomcat v6.0, choose "Start". Open http://localhost/ in a browser: you should see an empty page showing a blank directory listing (but not a 404 error). Eclipse incorrectly fails to copy the welcome pages when it sets up Tomcat, so if you want the friendlier welcome page, go to your-eclipse-workspace.metadata and search for "ROOT". Copy all of the files from C:apache-tomcat-6.0.28webappsROOT into the ROOT folder inside your-eclipse-workspace.metadata...ROOT. 
If you fail to copy the ROOT files as mentioned above, http://localhost/ will result in an empty directory listing. It is often mistaken for an error page, but if you look closely you will see that it says "directory listing for /" and is not an error at all. However, if you copy the ROOT files, http://localhost/ will give the nice friendly "Welcome to Tomcat" page.
4.  Make empty project.
a.       File, New, Project, Web, Dynamic Web Project.
b.      Give it a name (e.g., "SampleWebServer").
c.       Accept all other defaults.

5. Make a Welcome.html and place it on the ‘WebContent’ folder of your new Dynamic Web App.
6. Now if you type http://localhost:8080/SampleWebServer/Welcome.htmlin your browser, you should be able to view the page. 


Read More..

Do we really need S OFF

| 0 comments |
Lately there has been a lot of confusion about if we - HTC users - really need S-OFF on our devices. I think its time to make this case as clear as possible, and clear up any remaining doubts.

First of all, S-OFF stands for "Security OFF" and S-ON for "Security ON". Its a term specific to HTC devices (and refers to digital signature checking on the bootloader "hboot"). Retail devices always come with SHIP S-ON locked bootloaders. Hboot can also be found in an engineering version (ENG as opposed to SHIP), but its not easy to get such a device.

You should also know the "fastboot" term: it is a diagnostic protocol used primarily to modify the flash filesystem via a USB connection from host computer. After enabling the protocol on the device itself (entering "fastboot" mode from inside the bootloader), it will accept a specific set of commands sent to it via USB using a command line, for example "fastboot flash boot boot.img" or "fastboot erase cache".


Whats the main difference between S-ON and S-OFF from the end-user point of view?


With S-OFF you can:

  • Flash in fastboot original parts of the firmware like: Trust Zone (tz.img), Resource Power Manager (rpm.img), Advanced Digital Signal Processor (adsp.img), bootloader (hboot.img), Radio Config Data (rcdata.img), Splash Screen and others, very often device specific firmware like Consumer IR (cir.img) for the television remote controller in HTC One.
  • Flash in fastboot custom parts of the firmware above, however Ive never seen in my life anyone compiling custom rpm.img or tz.img. Ive seen custom bootloaders and Splash Screens only. You can also flash modified radio.img but there is rarely anyone out there who does this.
  • Use more advanced fastboot commands, for example you can change the CID (Carrier ID) of your device or even MID (Model ID). And this one is the most important one in the context of this article.
  • Reset the Tampered flag, so your device does not show up as "Relocked" if you relock your bootloader.

For about 2 years you have been able to unlock bootloaders of selected HTC devices on the htcdev.com webpage. Unlocking your bootloader results in an "UNLOCKED" message in the bootloader screen, and allows you to use some of the fastboot commands. For example system, boot and recovery partitions are no longer locked and you can flash a custom boot or recovery onto your device. This doesnt mean S-OFF, but it does give you some more control over your device.

Sometimes there are differences specific to the SoC ("System on a Chip") of each device. Both HTC One X and One X+ (nVidia Tegra 3) have locked out the capability to flash the boot partition from inside recovery, even if your bootloader is unlocked. It is possible to flash the boot partition only via the "fastboot flash boot <boot image name>" command. On the newest HTC smartphone - HTC One (Qualcomm Snapdragon S600) you can use either fastboot or adb shell (dd if=/... of=/...) to write the boot partition.

Do we really need S-OFF?

No, we dont. So what do we need? Because we surely need something. But to understand what we need, its important to realize where the problem is first.

First of all, comparing HTC devices with Nexus devices is a pointless activity. Never do that. Why? Because they are all S-ON (they call it Secure Boot), and updates for Nexus devices contain the following (based on my experience with Samsung Galaxy Nexus):
  1. bootloader.img
  2. recovery.img
  3. GSM radio
  4. CDMA radio (in case of CDMA device)
Thats all. On Nexus device you can flash the original bootloader or radio using the "package_extract_file" command in the updater-script. When HTC releases a major update, however, you will get:
  1. adsp.img
  2. cir.img
  3. dzdata_16g.hdr
  4. dzdata_16g.img
  5. dzdata_32g.hdr
  6. dzdata_32g.img
  7. dzdata_64g.hdr
  8. dzdata_64g.img
  9. bootloader.img
  10. radio.img
  11. recovery.img
  12. rpm.img
  13. sbl1-1.img
  14. sbl1-2.img
  15. sbl1-3.img
  16. sbl2.img
  17. sbl3.img
  18. tp.img
  19. tz.img
  20. more...
See the difference? This firmware images (if updated) are stored inside firmware.zip inside the OTA update. And without S-OFF you can manually update (using fastboot commands or command shell) only recovery, boot, system and sometimes radio. Other partitions are locked and you cant update firmware images other way then only with signed firmware.zip.

Content of HTC OTA update

However, very often, flashing only the content of the system and boot partitions is not enough to have the device fully working. For example, in the HTC One X it was necessary to use the new bootloader together with the official HTC Jelly Bean update, otherwise your device wouldnt boot with an older bootloader. This is why flashing a custom ROM for an HTC device is nowhere the same as flashing a custom ROM on a Nexus device. Apart from having the latest system files, you need to have the latest firmware.zip package flashed as well.

Because HTC sells their devices to different carriers around the world, they need to accept some requirements. For example carrier branding. Because of carrier branding, HTC has more than one version of the RUU (ROM Update Utility) for each device. To indicate the difference between the branded and un-branded versions of the same device, HTC used so called "CID" numbers. 

To find out your current CID number (together with some other useful info) you can use the "fastboot getvar all" command. Also, keep in mind that every OTA update checks CID/MID numbers before it will start to patch your system:


                         ifelse( is_ship_bootloader(getprop("ro.bootloader")) == "t" ,
                         assert(check_cid(getprop("ro.cid"), "00000000" , "11111111" ,
                         "22222222" , "33333333" , "44444444" , "55555555" , "66666666" ,
                         "77777777" , "88888888" , "99999999" , "HTC__001" , "HTC__E11" ,
                         "HTC__102" , "HTC__203" , "HTC__405" , "HTC__Y13" , "HTC__304" ,
                         "HTC__032" , "HTC__A07" , "HTC__J15" , "HTC__016") == "t"););
                         ifelse( is_ship_bootloader(getprop("ro.bootloader")) == "t" ,
                         assert(check_mid("full", "PN0710000") == "t");,
                         assert(check_mid("simple", "PN0710000") == "t"););

Obviously "check_cid" includes also SuperCIDs (00000000, 11111111, ...).
Content of android-info.txt
Its all in updater-script, so it can be easily edited anyway. But the real problem is different. As mentioned already, every OTA update contains firmware.zip - package with bootloader, radio, touch panel drivers, trust zone and other parts of important firmware. It also contains the "android-info.txt" file, where CIDs/MIDs are listed, so your S-ON bootloader wont let you flash an original firmware.zip if your CID number is not listed there. Yes, Im not talking here about custom radio, bootloader or anything custom at all. Original, untouched firmware.zip from an OTA update cant be flashed onto the device if the CID number doesnt match. Is it a problem? Yes, this is the real problem were dealing here with. Not S-ON/S-OFF, but CID restrictions and an inability to change the CID number.

How this can be resolved? "android-info.txt" is a plain text file, so it can be edited easily. If your CID number is not on the list, just add one more line with your CID. However, as long as your device is S-ON, you wont be able to flash it, because every firmware.zip is signed with a special key. Once firmware.zip is modified, the signature is broken and the bootloader will reject the request to update it. But there is a different method: you can change the CID number on your device with a fastboot command "fastboot oem writecid <cid number>". The best CID number to use is one of the WWE CIDs (for instance HTC__001). But wait - you cant use this particular fastboot command without S-OFF.

Is this problem a real one, or just some sort of users ill-informed craving? Its very real, because without the ability to flash firmware.zip from a WWE OTA update, every user from any carrier or different world region is forced to wait months to receive OTA updates customized to his CID. Everyone can de-brand his device easily by flashing a stock system image, but it wont be enough: because firmware.zip with corresponding parts of the firmware is needed at the same time. This isnt about the OTA itself, its about the firmware.zip inside that OTA update.

Dangers:

So what are the dangers of obtaining S-OFF on your device? Some of the partitions in the device are extremely sensitive and can result in your device being bricked if they are even slightly corrupted. With S-OFF you can access all of these partitions and the slightest corruption during transfer (whether that be a power spike or you jiggled the cable slightly) can result in a bricked device as it does not check for signatures.

Here’s an example which has almost happened to me once on an S-OFF device: I was flashing a boot.img via fastboot, the command is: "fastboot flash boot boot.img". However I had made a small but significant typo: "fastboot flash hboot boot.img", simply by mis-hitting the B key; this command would be rejected by a device with S-ON as it is a protected partition, but would be accepted on a device with S-OFF. If I had pressed enter without checking the command, my device would have turned into a paperweight in seconds.
One of the most popular protected partitions the hacking community enjoy flashing is the radio partition. This is also a partition where the slightest corruption will cause your phone to brick. The FCC guidelines state the the radio must be booted with a separate processor (I guess to decrease the risk of it being tampered with), so what happens in a phone when it turns on is: radio is booted via a dedicated processor by the first stage loader, initialising the radio hardware (Wifi, Data, Bluetooth, etc.). Radio successfully boots and initiates the first stage loader to use the main CPU to load the second stage loader into RAM (also known as the SPL). Depending on the boot operation, it will either initiate the system or recovery. So without a functioning radio, the main CPU will not kick on and boot the phone.

Some other facts:
  1. You dont need S-OFF to root your device.
  2. You dont need S-OFF to be able to run Titanium Backup or other applications that requires root access. You just need root privileges for that.
  3. You dont need S-OFF to flash custom recovery image onto your device.
To summarize:

We dont need S-OFF, but we do need the ability to edit the CID number on the device (lets say at least on officially UNLOCKED devices), or the firmware.zip packages inside an OTA update should not be signed, so that "android-info.txt" can be easily edited, or the CID restrictions from android-info.txt should be removed (MID is enough to ensure that the right firmware gets to the right devices).

Something to re-think?

Even if we dont need S-OFF Im quite worried about the policies of mobile companies and carriers. Their philosophy is "the more you are locked down, the more you are protected". That means Police should not fight with criminals, but everyone should just lock down their doors, windows and stay at home instead. Its far easier and cheaper to lock down mobile devices and not allow root access rather then improving the security in other areas.

Can you imagine that you just bought a brand new notebook for $3000 and:
  • you can login only as a Guest (no Administrator account available by default),
  • you cant change your operating system,
  • you cant use applications that requires Administrator privileges,
  • you cant browse freely the content of your hard drive.
You would say "Where the hell is my freedom?!" Here comes the answer from your notebook manufacturer - "For your own security, you dont have any freedom". Sounds like a George Orwell story to me.

I want the same freedom on my phone that I have on my PC.


This article was written in a cooperation with Shen Ye


Have any questions or comments? Feel free to share! Also, if you like this article, please use media sharing buttons (Twitter, G+, Facebook) down this post!


PS. I want thank to Tom Kelsall, my HTC Elevate companion for his help in a proper grammar redaction of the review! Thanks Tom!
Read More..

The Difference between Handler and AsyncTask

| 0 comments |

After we saw both Handlers and AsyncTasks a question may evolve: whats the difference between the two and when to use one of them over the other ?

The Handler is associated with the applications main thread. it handles and schedules messages and runnables sent from background threads to the app main thread.

AsyncTask provides a simple method to handle background threads in order to update the UI without blocking it by time consuming operations.

The answer is that both can be used to update the UI from background threads, the difference would be in your execution scenario. You may consider using handler it you want to post delayed messages or send messages to the <strong>MessageQueue</strong> in a specific order.

You may consider using AsyncTask if you want to exchange parameters (thus updating UI) between the app main thread and background thread in an easy convinient way.
Read More..

Converga brings together on site and remote employees virtually with Chromebooks

| 0 comments |


Editors note: Today’s guest blogger is Douglas Grgas at Converga, a business process outsourcing company based in Australia, providing digital mailroom, document processing and a variety of other managed services. Converga introduced Chromebooks to ensure better availability of internal services for remote employees, as well as a new platform for office staff.

When employees are based in many different locations, whether it’s at corporate offices or customer sites, it’s important to make all employees feel connected to headquarters. As a company with over 1,300 resources at more than 150 customer locations, we’ve addressed this challenge firsthand by providing employees with technology to stay in touch. Many of our employees spend the majority of their time at our customers’ offices providing managed services, such as operating mailrooms or converting paper documents to digital versions.

To bridge the gap between off-site and on-site communications, account managers visited customer sites regularly to communicate with remote employees, and our CEO carried out a roadshow, where he talked about company performance, new customer wins and progress on global objectives, but off-site employees still felt disconnected from central operations on a day-to-day basis.

Our biggest ongoing challenge with keeping employees connected while at customer sites was having to rely on customers’ devices and networks. Often employees couldn’t access email and the Internet, which resulted in being disconnected from corporate communications and reduced productivity. We wanted everyone to feel connected and productive wherever they were, and to have access to technology that simplified their activities.

We chose Chrome for Converga because of its simplicity of use and seamless remote management. We liked that Chromebooks are sleek and lightweight like a tablet, but have a keyboard for easy data entry.

Beyond the device, the central Chrome Device Management service allows easy deployment and controls, device security, network connectivity and integrated apps across Converga’s fleet of Chromebooks, all with the additional benefit of leveraging Google’s Support services.

Also, since Chromebooks integrate with Citrix XenApp, which virtually delivers existing apps through the Chrome Browser, we don’t have to repurchase or rewrite existing applications.

Converga has deployed Chromebooks at 50 customer sites across Australia and New Zealand during the past year. We’ve also deployed numerous devices, many utilizing the Citrix XenApp, at our corporate offices.

Now more than 500 employees have a two-way channel to communicate with headquarters, using a reliable and standard operating environment, which IT can manage remotely. Employees can quickly search for information using Chrome, record notes in Google Docs and communicate with employees at other sites via Hangouts and Google+, all accessible via a simple to use, remotely managed, lightweight device.

Chromebooks are the foundation that helps our employees connect with each other and senior management. We use our company Google Site, which acts as our intranet, to do everything from feature employees of the month to communicate company perks and share performance metrics. Employees also use the intranet to share updates about customer sites, so the rest of the business can stay connected. For example, around Christmas, our employees post pictures of how their customers have decorated for the holidays. Each time an employee does something related to the Converga tree, a tree that represents our company values, he or she is asked to share the activity with the rest of the community.

Introducing Chromebooks has supported our goal of making all employees, regardless of their location, feel united. As we continue to introduce new technologies, our employees are more engaged in their work and empowered to share their stories with one another.
Read More..

Speakers and sessions for Education on Air

| 0 comments |


(Cross-posted on the Google for Education Blog.)

Last month we announced Education on Air — our free online conference taking place May 8-9, 2015 — and asked what you wanted to hear about. Today we released the schedule of sessions, based largely on what we heard from you. We’ll emphasize innovation — 44% of you voted for this — as well as how to empower students and use Google tools effectively. It was clear from our second poll that you also want practical examples, so our speakers will go beyond theory and share their specific advice for enacting change.


Here’s a look at what you can expect over the two-day conference:

Friday, May 8: Leading for the future

Tune in from 10 a.m. to 3 p.m. ET to hear from educators, business and policy leaders, students and researchers, whose keynotes will challenge you to innovate and improve education. In our kickoff session, panelists will tackle the question “What are the skills of the future?” and will touch upon results from an Economist Intelligence Unit survey. You’ll also hear panels of different perspectives about some hot topics for educators, including how technology is transforming learning and how students are guiding their own learning.

In addition to these panels, our keynote speakers will share their personal passions for the future of education. You’ll hear from Actor, Education Advocate, and Host of Reading Rainbow LeVar Burton, Google Senior Vice President of People Operations Laszlo Bock, education leader and Order of Canada honoree Michael Fullan, and Sir Michael Barber, chief education advisor to Pearson and former Chief Adviser to the Secretary of State for Education during the first term of British Prime Minister Tony Blair. Educators and school leaders like Ryan Bretag, education researcher and Chief Innovation Officer of Illinois’ District 225, and students like Brittany Wenger (2012 Google Science Fair winner) will also share their perspectives.

Saturday, May 9: Shaping the classroom today

Over 100 sessions will be led by educators from 12 countries and 29 U.S. states, all specifically designed to offer practical advice and examples. Whether you’re interested in the track for educators, administrators, IT or “anyone,” we invite you to join for the sessions that are most interesting to you.

Presenters will discuss tools and techniques that you can implement easily, affordably and immediately. Many sessions highlight how Google tools like Google Apps, Earth, Chromebooks and Android tablets can support learning and help educators save time. Others will relate to themes including collaboration and community, computer science and STEM, creation and creativity, digital citizenship, literacy and professional development.

Here’s a flavor of the range of sessions:

  • Guy Shearer, Head of IT for the David Ross Education Trust in the UK will lead “Create impact by rolling out Chromebooks across a network of schools” at 8:30 a.m. ET
  • Kim Meldrum, Pedagogical Consultant for the Lester B. Pearson School Board in Canada will lead a session on “Developing literacy with Google Apps” at 11:00 a.m. ET
  • Sean Beavers, Digital Information Specialist at the West Morris Regional High School District will lead "Fostering student genius: empowering student leadership through technology" at 12:15 p.m. ET
  • Tonia Dousay, Assistant Professor at the University of Wyoming will lead a session called “Bringing the maker movement to your classroom” at 12:30 p.m. ET
  • James Sanders, Director of Innovation for the EdTechTeam will lead “How to survive a zombie apocalypse using Google Apps” at 3:00 p.m. ET

Visit the Education on Air site to see the full line-up of sessions and make sure to register; because even if you can’t join us live, if you register we’ll notify you when the recordings are available to view.

We hope to “see” you there!
Read More..

Add and Remove view dynamically keep track of child views

| 0 comments |
I have a old example of "Add and Remove view dynamically". Somebody ask how the Remove button keep track of the views. So I modify the example to explain in more details.


In this example, when user click on the Add button, it will create a child View, addView. The addView have a Button, buttonRemove. The buttonRemove have its own OnClickListener object. The OnClickListener object refer to the specified addView when it is created.

That means the OnClickListener object of the buttonRemove in the first child view("abc") not the same object in the second child view("abcdef"), not the same object in the third child view("abcdefghi")...All have its own individual OnClickListener object. And each OnClickListener object refer to a specified addView object. Such that it can keep track of the child Views, addView.


MainActivity.java
package com.blogspot.android_er.androiddynamicview;

import android.content.Context;
import android.os.Bundle;
import android.support.v7.app.AppCompatActivity;
import android.text.method.ScrollingMovementMethod;
import android.view.LayoutInflater;
import android.view.View;
import android.widget.Button;
import android.widget.EditText;
import android.widget.LinearLayout;
import android.widget.TextView;

public class MainActivity extends AppCompatActivity {

EditText textIn;
Button buttonAdd;
LinearLayout container;
TextView reList, info;

@Override
protected void onCreate(Bundle savedInstanceState) {
super.onCreate(savedInstanceState);
setContentView(R.layout.activity_main);

textIn = (EditText)findViewById(R.id.textin);
buttonAdd = (Button)findViewById(R.id.add);
container = (LinearLayout)findViewById(R.id.container);
reList = (TextView)findViewById(R.id.relist);
info = (TextView)findViewById(R.id.info);
info.setMovementMethod(new ScrollingMovementMethod());

buttonAdd.setOnClickListener(new View.OnClickListener(){
@Override
public void onClick(View v) {
LayoutInflater layoutInflater =
(LayoutInflater) getBaseContext().getSystemService(Context.LAYOUT_INFLATER_SERVICE);
final View addView = layoutInflater.inflate(R.layout.row, null);
TextView textOut = (TextView)addView.findViewById(R.id.textout);
textOut.setText(textIn.getText().toString());
Button buttonRemove = (Button)addView.findViewById(R.id.remove);

final View.OnClickListener thisListener = new View.OnClickListener(){
@Override
public void onClick(View v) {
info.append("thisListener called: " + this + " ");
info.append("Remove addView: " + addView + " ");
((LinearLayout)addView.getParent()).removeView(addView);

listAllAddView();
}
};

buttonRemove.setOnClickListener(thisListener);
container.addView(addView);

info.append(
"thisListener: " + thisListener + " "
+ "addView: " + addView + " "
);

listAllAddView();
}
});
}

private void listAllAddView(){
reList.setText("");

int childCount = container.getChildCount();
for(int i=0; i<childCount; i++){
View thisChild = container.getChildAt(i);
reList.append(thisChild + " ");
}
}
}


layout/activity_main.xml
<?xml version="1.0" encoding="utf-8"?>
<LinearLayout

android_layout_width="match_parent"
android_layout_height="match_parent"
android_orientation="horizontal"
android_padding="16dp"
tools_context="com.blogspot.android_er.androiddynamicview.MainActivity">


<LinearLayout
android_layout_width="0dp"
android_layout_height="match_parent"
android_layout_weight="1"
android_orientation="vertical">

<RelativeLayout
android_layout_width="match_parent"
android_layout_height="wrap_content">

<Button
android_id="@+id/add"
android_layout_width="wrap_content"
android_layout_height="wrap_content"
android_layout_alignParentRight="true"
android_text="Add" />

<EditText
android_id="@+id/textin"
android_layout_width="match_parent"
android_layout_height="wrap_content"
android_layout_alignParentLeft="true"
android_layout_toLeftOf="@id/add" />
</RelativeLayout>

<LinearLayout
android_id="@+id/container"
android_layout_width="match_parent"
android_layout_height="wrap_content"
android_orientation="vertical"></LinearLayout>

</LinearLayout>

<LinearLayout
android_layout_width="0dp"
android_layout_height="match_parent"
android_layout_weight="1"
android_orientation="vertical">

<TextView
android_layout_width="wrap_content"
android_layout_height="wrap_content"
android_layout_gravity="center_horizontal"
android_autoLink="web"
android_text="http://android-er.blogspot.com/"
android_textStyle="bold" />

<TextView
android_id="@+id/relist"
android_layout_width="match_parent"
android_layout_height="0dp"
android_layout_weight="1"
android_textStyle="bold"
android_background="#E0E0E0"/>
<TextView
android_id="@+id/info"
android_layout_width="match_parent"
android_layout_height="0dp"
android_layout_weight="1"
android_textStyle="italic"
android_background="#D0D0D0"
android_gravity="bottom"/>

</LinearLayout>
</LinearLayout>


layout/row.xml, the layout of the child views.
<RelativeLayout 

android_layout_width="match_parent"
android_layout_height="wrap_content">
<Button
android_id="@+id/remove"
android_layout_width="wrap_content"
android_layout_height="wrap_content"
android_layout_alignParentRight="true"
android_text="Remove"/>
<TextView
android_id="@+id/textout"
android_layout_width="match_parent"
android_layout_height="wrap_content"
android_layout_alignParentLeft="true"
android_layout_toLeftOf="@id/remove"/>
</RelativeLayout>


download filesDownload the files (Android Studio Format) .

Its another approach to share a common OnClickListener between all buttonRemove.

more:
- Add and Remove view dynamically, with EditText/AutoCompleteTextView inside

Read More..

Monitor your Windows cpu usage temperature with HWiNFO

| 0 comments |
Just tried HWiNFO to monitor Windows 10 CPU usage, temperature..., very nice:) Comprehensive Hardware Analysis, Monitoring and Reporting for Windows and DOS. FREEWARE!


In-depth Hardware Information
From a quick overview unfolding into the depth of all hardware components. Always up-to date supporting latest technologies and standards.

Real-Time System Monitoring
Accurate monitoring of all system components for actual status and failure prediction. Customizable interface with variety of options.

Extensive Reporting
Multiple types of reports, status logging and interfacing with other tools or add-ons.


~ link: http://www.hwinfo.com/


Read More..

Let’s build a new work Inbox together

| 0 comments |


Have you ever felt like your inbox was someone else’s to-do list? Requests, project updates and action items stream in all day. You move between your computer and the phone in your pocket to try to manage, and instead of focusing on the most important things, you find yourself focusing on the most recent things. No matter the device, email should feel like a time saver, but instead it feels like a chore.

This is why we created Inbox by Gmail, to help you focus on the things that matter to you. Since we launched five months ago, one of the biggest pieces of feedback we’ve received is that Google Apps customers want access to Inbox at work. That’s why were excited to kick off the next phase of our journey: collaborating with you to bring Inbox to work.

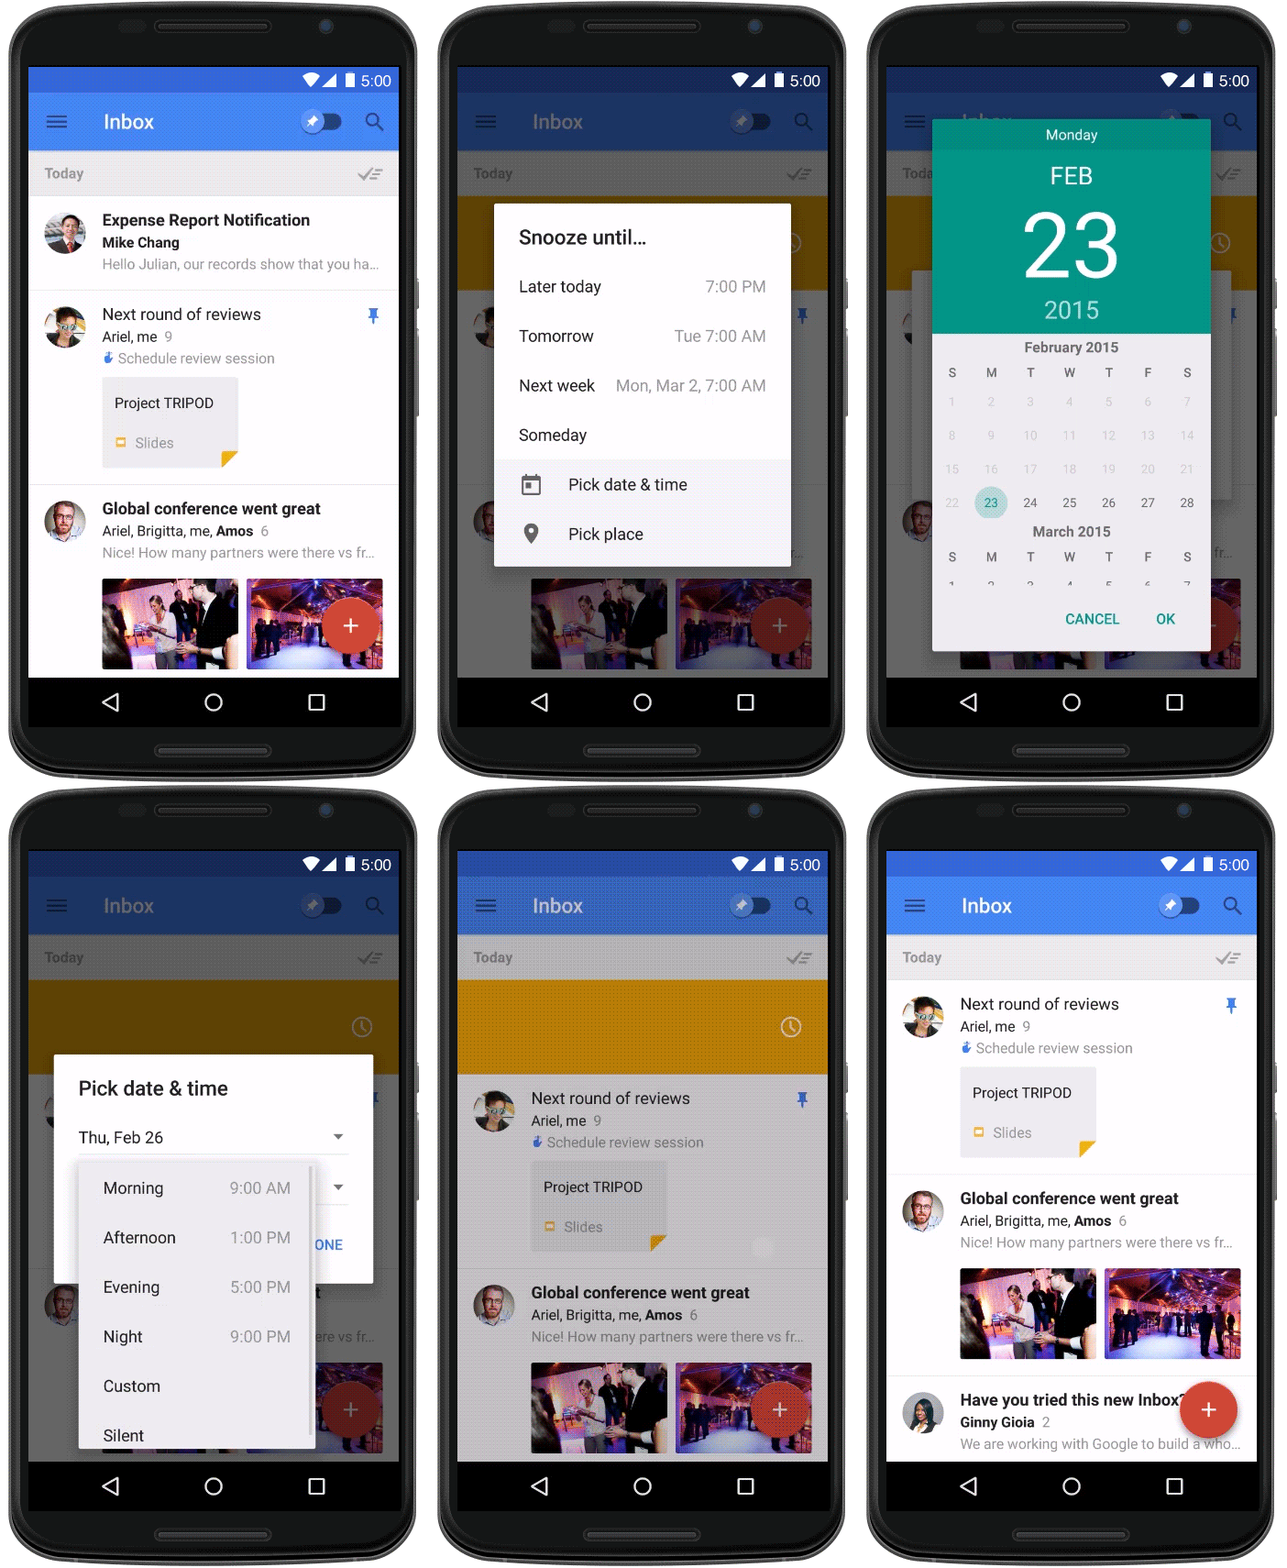
Even before the first invitations went out to use Inbox for your own email, Googlers have been using it to get more done at work. Whether it’s snoozing the expense report notification until after the big presentation, or adding a reminder to schedule lunch with a favorite client, Inbox helps put email on your terms. And since Inbox was built on the same infrastructure as Gmail, it meets the same high security standards you expect from email.
Of course, every company and every person is different, so we want to get more input on how Inbox will work at your company. Starting next month, we’ll begin enabling Inbox for a small group of Google Apps customers to learn about their needs, challenges and use cases.
  • Do you want to use Inbox as your primary email at work?
  • Are employees at your company heavy mobile users?
  • Most importantly, do you want to partner with Google on user studies to help build the new work Inbox?
If you answered “yes, yes and yes!” then email inboxforwork@google.com from your Google Apps for Work administrator account to apply for an invitation to the early adopter program. To start, we plan to work very closely with the early adopter companies, so not everyone that applies will be accepted right away, but the program will continue to expand over the coming months.

Inbox wasn’t created to reinvent email, Inbox was created to help you reinvent the way you get things done. This means we need to understand more about how things get done (or don’t) today. And with your feedback, who knows, we could reinvent the way people work.

Note: Only the Google Apps administrator can apply for entry to the Inbox for work early adopter program.
Read More..

Disable FloatingActionButton

| 0 comments |

To disable FloatingActionButton, we can call its setEnabled() method. We can also make it invisible or gone by calling its setVisibility() method.


Create a Hello World project of Blank Activity in Android Studio.


Edit layout/content_main.xml to add RadioButtons.
<?xml version="1.0" encoding="utf-8"?>
<LinearLayout


android_layout_width="match_parent"
android_layout_height="match_parent"
android_padding="16dp"
app_layout_behavior="@string/appbar_scrolling_view_behavior"
tools_showIn="@layout/activity_main"
tools_context=".MainActivity"
android_orientation="vertical">

<TextView
android_layout_width="wrap_content"
android_layout_height="wrap_content"
android_layout_gravity="center_horizontal"
android_autoLink="web"
android_text="http://android-er.blogspot.com/"
android_textStyle="bold" />

<RadioGroup
android_id="@+id/groupenable"
android_layout_width="fill_parent"
android_layout_height="wrap_content"
android_orientation="horizontal">
<RadioButton
android_id="@+id/fabenable"
android_layout_width="wrap_content"
android_layout_height="wrap_content"
android_text="Enable"
android_checked="true"/>
<RadioButton
android_id="@+id/fabdisable"
android_layout_width="wrap_content"
android_layout_height="wrap_content"
android_text="Disable"/>
</RadioGroup>
<RadioGroup
android_id="@+id/groupvisibility"
android_layout_width="fill_parent"
android_layout_height="wrap_content"
android_orientation="horizontal">
<RadioButton
android_id="@+id/fabvisible"
android_layout_width="wrap_content"
android_layout_height="wrap_content"
android_text="Visible"
android_checked="true"/>
<RadioButton
android_id="@+id/fabinvisible"
android_layout_width="wrap_content"
android_layout_height="wrap_content"
android_text="Invisible"/>
<RadioButton
android_id="@+id/fabgone"
android_layout_width="wrap_content"
android_layout_height="wrap_content"
android_text="Gone"/>
</RadioGroup>
</LinearLayout>


Modify MainActivity.java
package com.blogspot.android_er.androidfloatingactionbutton;

import android.os.Bundle;
import android.support.design.widget.FloatingActionButton;
import android.support.design.widget.Snackbar;
import android.support.v7.app.AppCompatActivity;
import android.support.v7.widget.Toolbar;
import android.view.Menu;
import android.view.MenuItem;
import android.view.View;
import android.widget.RadioButton;
import android.widget.RadioGroup;

public class MainActivity extends AppCompatActivity {

RadioGroup groupEnable, groupVisibility;
RadioButton btnEnable, btnDisable;
RadioButton btnVisible, btnInvisible, btnGone;

@Override
protected void onCreate(Bundle savedInstanceState) {
super.onCreate(savedInstanceState);
setContentView(R.layout.activity_main);
Toolbar toolbar = (Toolbar) findViewById(R.id.toolbar);
setSupportActionBar(toolbar);

final FloatingActionButton fab = (FloatingActionButton) findViewById(R.id.fab);
fab.setOnClickListener(new View.OnClickListener() {
@Override
public void onClick(View view) {
Snackbar.make(view, "Replace with your own action", Snackbar.LENGTH_LONG)
.setAction("Action", null).show();
}
});

groupEnable = (RadioGroup)findViewById(R.id.groupenable);
btnEnable = (RadioButton)findViewById(R.id.fabenable);
btnDisable = (RadioButton)findViewById(R.id.fabdisable);
groupVisibility = (RadioGroup)findViewById(R.id.groupvisibility);
btnVisible = (RadioButton)findViewById(R.id.fabvisible);
btnInvisible = (RadioButton)findViewById(R.id.fabinvisible);
btnGone = (RadioButton)findViewById(R.id.fabgone);

groupEnable.setOnCheckedChangeListener(new RadioGroup.OnCheckedChangeListener(){
@Override
public void onCheckedChanged(RadioGroup group, int checkedId) {
if(btnEnable.isChecked()){
fab.setEnabled(true);
}else{
fab.setEnabled(false);
}
}
});

groupVisibility.setOnCheckedChangeListener(new RadioGroup.OnCheckedChangeListener(){
@Override
public void onCheckedChanged(RadioGroup group, int checkedId) {
if(btnVisible.isChecked()){
fab.setVisibility(FloatingActionButton.VISIBLE);
}else if(btnInvisible.isChecked()){
fab.setVisibility(FloatingActionButton.INVISIBLE);
}else{
fab.setVisibility(FloatingActionButton.GONE);
}
}
});
}

@Override
public boolean onCreateOptionsMenu(Menu menu) {
// Inflate the menu; this adds items to the action bar if it is present.
getMenuInflater().inflate(R.menu.menu_main, menu);
return true;
}

@Override
public boolean onOptionsItemSelected(MenuItem item) {
// Handle action bar item clicks here. The action bar will
// automatically handle clicks on the Home/Up button, so long
// as you specify a parent activity in AndroidManifest.xml.
int id = item.getItemId();

//noinspection SimplifiableIfStatement
if (id == R.id.action_settings) {
return true;
}

return super.onOptionsItemSelected(item);
}
}


Read More..

Episode 40 Material World

| 0 comments |
This time, Tor and Chet talk with Nicholas Jitkoff from the Material group about... Material Design. And design in general. And engineering. And splash screens. And other stuff.

Favorite words: Materiality. Skiamorphic.

Subscribe to the podcast feed or download the audio file directly.

Relevant Links

Material Design
Zombo

Nicholas: google.com/+NicholasJitkoffJ, @alcor
Tor: google.com/+TorNorbye, @tornorbye
Chet: google.com/+ChetHaase, @chethaase

Thanks to continued tolerance and support by our audio engineer, Bryan Gordon.
Read More..

Quake III on your TV with Cast Remote Display API

| 0 comments |

Posted by Leon Nicholls, Developer Programs Engineer and Antonio Fontan, Software Engineer

At Google I/O 2015 we announced the new Google Cast Remote Display APIs for Android and iOS that make it easy for mobile developers to bring graphically intensive apps or games to Google Cast receivers. Now you can use the powerful GPUs, CPUs and sensors of the mobile device in your pocket to render both a local display and a virtual one to the TV. This dual display model also allows you to design new game experiences for the display on the mobile device to show maps, game pieces and private game information.

We wanted to show you how easy it is to take an existing high performance game and run it on a Chromecast. So, we decided to port the classic Quake® III Arena open source engine to support Cast Remote Display. We reached out to ID Software and they thought it was a cool idea too. When all was said and done, during our 2015 I/O session “Google Cast Remote Display APIs for Games” we were able to present the game in 720p at 60 fps!

During the demo we used a wired USB game controller to play the game, but weve also experimented with using the mobile device sensors, a bluetooth controller, a toy gun and even a dance mat as game controllers.

Since youre probably wondering how you can do this too, heres the details of how we added Cast Remote Display to Quake. The game engine was not modified in any way and the whole process took less than a day with most of our time spent removing UI code not needed for the demo. We started by using an existing source port of Quake III to Android which includes some usage of kwaak3 and ioquake3 source code.

Next, we registered a Remote Display App ID using the Google Cast SDK Developer Console. There’s no need to write a Cast receiver app as the Remote Display APIs are supported natively by all Google Cast receivers.

To render the local display, the existing main Activity was converted to an ActionBarActivity. To discover devices and to allow a user to select a Cast device to connect to, we added support for the Cast button using MediaRouteActionProvider. The MediaRouteActionProvider adds a Cast button to the action bar. We then set the MediaRouteSelector for the MediaRouter using the App ID we obtained and added a callback listener using MediaRouter.addCallback. We modified the existing code to display an image bitmap on the local display.

To render the remote display, we extended CastPresentation and called setContentView with the game’s existing GLSurfaceView instance. Think of the CastPresentation as the Activity for the remote display. The game audio engine was also started at that point.

Next we created a service extending CastRemoteDisplayLocalService which would then create an instance of our CastPresentation class. The service will manage the remote display even when the local app goes into the background. The service automatically provides a convenient notification to allow the user to dismiss the remote display.

Then we start our service when the MediaRouter onRouteSelected event is called by using CastRemoteDisplayLocalService.startService and stop the service when the MediaRouter onRouteUnselected event is called by using CastRemoteDisplayLocalService.stopService.

To see a more detailed description on how to use the Remote Display APIs, read our developer documentation. We have also published a sample app on GitHub that is UX compliant.

You can download the code that we used for the demo. To run the app you have to compile it using Gradle or Android Studio. You will also need to copy the "baseq3" folder from your Quake III game to the “qiii4a” folder in the root of the SD card of your Android mobile device. Your mobile device needs to have at least Android KitKat and Google Play services version 7.5.71.

With 17 million Chromecast devices sold and 1.5 billion touches of the Cast button, the opportunity for developers is huge, and it’s simple to add this extra functionality to an existing game. Were eager to see what amazing experiences you create using the Cast Remote Display APIs.

QUAKE II © 1997 and QUAKE III © 1999 id Software LLC, a ZeniMax Media company. QUAKE is a trademark or registered trademark of id Software LLC in the U.S. and/or other countries. QUAKE game assets used under license from id Software LLC. All Rights Reserved

QIII4A © 2012 n0n3m4. GNU General Public License.

Q3E © 2012 n0n3m4. GNU General Public License.

Read More..

Learn top tips from Kongregate to achieve success with Store Listing Experiments

| 0 comments |

Originally posted on Android Developer blog

Posted by Lily Sheringham, Developer Marketing at Google Play

Editor’s note: This is another post in our series featuring tips from developers finding success on Google Play. We recently spoke to games developer Kongregate, to find out how they use Store Listing Experiments successfully. - Ed.

With Store Listing Experiments in the Google Play Developer Console, you can conduct A/B tests on the content of your store listing pages. Test versions of the text and graphics to see which ones perform best, based on install data.

Kongregate increases installs by 45 percent with Store Listing Experiments

Founded in 2006 by brother and sister Jim and Emily Greer, Kongregate is a leading mobile games publisher specializing in free to play games. Kongregate used Store Listing Experiments to test new content for the Global Assault listing page on Google Play. By testing with different audience sizes, they found a new icon that drove 92 percent more installs, while variant screenshots achieved an impressive 14 percent improvement. By picking the icons, screenshots, and text descriptions that were the most sticky with users, Kongregate saw installs increase by 45 percent on the improved page.

Kongregate’s Mike Gordon, VP of Publishing; Peter Eykemans, Senior Producer; and Tammy Levy, Director of Product for Mobile Games, talk about how to successfully optimise mobile game listings with Store Listing Experiments.


Kongregate’s tips for success with Store Listing Experiments

Jeff Gurian, Sr. Director of Marketing at Kongregate also shares his do’s and don’ts on how to use experiments to convert more of your visitors, thereby increasing installs. Check them out below:

Do’s Don’ts
Do start by testing your game’s icon. Icons can have the greatest impact (positive or negative) on installs — so test early! Don’t test too many variables at once. It makes it harder to determine what drove results. The more variables you test, the more installs (and time) you’ll need to identify a winner.
Do have a question or objective in mind when designing an experiment. For example, does artwork visualizing gameplay drive more installs than artwork that doesn’t? Don’t test artwork only. Also test screenshot ordering, videos, and text to find what combinations increase installs.
Do run experiments long enough to achieve statistical significance. How long it takes to get a result can vary due to changes in traffic sources, location of users, and other factors during testing. Don’t target too small an audience with your experiment variants. The more users you expose to your variants, the more data you collect, the faster you get results!
Do pay attention to the banner, which tells you if your experiment is still “in progress.” When it has collected enough data, the banner will clearly tell you which variant won or if it was a tie. Don’t interpret a test where the control attribute performs better than variants as a waste. You can still learn valuable lessons from what “didn’t work.” Iterate and try again!

Learn more about how Kongregate optimized their Play Store listing with Store Listing Experiments. Learn more about Google Play products and best practices to help you grow your business globally.

Read More..

Trick your brain black and white photo turns to colour! Colour The Spectrum of Science BBC

| 0 comments |

Trick your brain: black and white photo turns to colour! - Colour: The Spectrum of Science - BBC

Programme website: http://bbc.in/1Q7ik5S Look at the photo in the clip. From a picture that contains no colour our brains are able to construct a full colour image.


I tried to develop a example to experience it - Display image in opposite color to Trick your brain.

Read More..

Currency Converter v1 0 released on Slide ME

| 0 comments |
Currency Converter v1.0 is released and is available at this location:


the application provides real time currency convertion for more than 100 currencies.

provides the conversion rate of two currencies and the conversion of an amount of money from one currency to another.

download it for free and tell me what you think.
Read More..

New feature on xda developers XDA DevDB

| 0 comments |
Recently xda-developers presented new forum feature: Development Database, or DevDB for short.

Here is a short list of what is actually does:
  • Download manager with an XDA torrent tracker
  • ROMs can have multiple "contributors" who can make changes, add files, etc.
  • Ability to tag ROMs (so they are searchable for users)
  • Screenshot management
  • Ability to reserve up to two posts in your ROM thread (below the first post)
  • ROM reviews
  • Q&A thread association
  • Bug tracker / feature requester
  • ROMs will be flashable directly from DevDB *coming soon*
  • Users can "follow" a ROM and get auto-notified of updates

Of course its not only about ROMs. Any developer can add f.g. kernel project too.

What I find interesting so far is the possibilities to write a short reviews and follow the project. Everyone can also contribute by writing some idea for some new feature or submit a bug in a bug tracker.

If you have free 5 minutes (its how much it takes!) please take a look at this new system and follow my HTC One "project" under this link - follow project (if you are HTC One owner) and leave your review for my HTC One ROM under this link - write a short review.

The project is currently in beta stage, and number of supported devices is limited to:

Galaxy S II, III, and 4
HTC One

Sony Xperia Tablet Z
Sony Xperia Z
Droid DNA
Nexus 4, 10, 7
Galaxy Note II

Personally I think that DevDB is a great idea, however it surely needs some time before users and developers will get used to it.

Have any questions or comments? Feel free to share! Also, if you like this article, please use media sharing buttons (Twitter, G+, Facebook) down this post!
Read More..

Episode 42 Tool Time

| 0 comments |
The fancy ADB recording studio, with our featured guest.
In this episode, Tor and I talk with... each other. This episode is all about Android Studio. In particular, we talk about the latest features and massive performance improvements in the Android Studio preview that was detailed at the Android Dev Summit and which has
been in development and under improvement since then.

Subscribe to the podcast feed or download the audio file directly.

Relevant Links

Android Studio tips & tricks video
All of the Android Dev Summit Talks
Android Studio
Android Studio Recent Changes
Instant Run
Proguard

Tor: google.com/+TorNorbye, @tornorbye
Chet: google.com/+ChetHaase, @chethaase
Read More..

Image Resources

| 0 comments |
Android provides us with the ability to use image resources in our applications. We can put image files in res/drawable directory and access them from the xml layout or by the generated ID from R.java class file.

You can use image files of the following formats:
  • PNG
  • JPEG
  • GIF
Notice that there are two restrictions:
  • If you use two files with the same base name you will receive an error. You cannot use two files like Hello.jpeg and Hello.png.
  • If you create any subdirectory under res/drawable directory any image files in it will be ignored.
Now let’s demonstrate how can we use image resources


We will place an image called android.jpeg in res/drawable directory

We can use it from xml layout as this
<imageview android_layout_height="wrap_content" android_layout_width="wrap_content" android_src="@drawable/android" /%gt;


Or from code as this
ImageView img=(ImageView)findViewById(R.id.img);
img.setImageResource(R.drawable.android);

or like this to get the image as a drawable object

ImageView img2=(ImageView)findViewById(R.id.img2);
Drawable drawable=this.getResources().getDrawable(R.drawable.android);
img2.setBackgroundDrawable(drawable);

Color drawable Resources:
You can define XML files that contain definitions for color drawable resources which are color rectangles that can be used as backgrounds

You can define the color drawable resources in values/strings.xml file or by creating a custom xml file to hold these resources

You define color drawable resources like this:
<drawable name="redBox">#f00</drawable>
You can use it from xml layout like this


Or from code like this:
TextView txt=(TextView)findViewById(R.id.txt);
txt.setBackgroundResource(R.drawable.redBox);

or like this:
ColorDrawable drawable2=(ColorDrawable)this.getResources().getDrawable(R.drawable.redBox);
txt.setBackgroundDrawable(drawable2);

or this
txt.setBackgroundResource(R.drawable.redBox);
notice that if the textview does not have text the background color will not appear.

Download a demo application from here
Read More..

Web 2 0 for the software services industry

| 0 comments |
Here are some of my thoughts on what Web 2.0 would mean to the software services industry.

The five main principles that qualify for calling and application / site Web 2.0 is:
1. Web as a Platform and Software as a service
2. Architecture of participation for harnessing collective intelligence
3. Own or create hard-to-recreate data sources
4. Software through multiple channels and devices
5. Rich User interface or Rich Internet Applicaitons

While the principle 2 seems to be attracting the most attention in Web 2.0, for the services industry, principle 1 holds the key.

Let me elaborate what I mean. In terms of implementation, principle 2 stands for creating and enhancing the network of people visiting your applicaitons and using them or adding value to them through blogs, wikis, social networks, susbscription of feeds, provide permalinks and trackbacks, allowing tagging or folsonomy as some call it. Now, providing or building these features is a breeze. Most of them can be just configured by using many available off-the-shelf, open source software.

Also, practically speaking, if an organization does not have a core business around which to implement web 2.0, just providing the above is not going to be of any value add to itself.

The crux continues to remain that any organization must have a core business model that needs to adapt itself to Web 2.0. By this I mean, they must be providing some service in the real world and that should preferrably have already made its presence on the web through the Web 1.0 way. Even if not, it needs to be morphed to be provided as an online service, in the first go.

This is nothing but extending the web service model to the real "web". While the former was more often than not, within the walls of an enterprise or extended mainly to business partners, the latter would be real services maintained for the public use on the web by anyone who subscribes and pays for it. This would mainly help the smaller business of both types: the providers of such services as well as the consumers of such services.

There are enough successful models over the last couple of years like the salesforce.com which are thriving on this business model, a model of revenue generation that did not exist inherently in web 1.0. This may be one of the main causes for a potential success of Web 2.0, as I see it.
Read More..

Docker images for Dart now available

| 0 comments |
By Søren Gjesse, Software Engineer on Dart

Developers increasingly want to use the same language and business logic on the client and the server to reduce risk and complexity. To help developers easily build and deploy end-to-end Dart apps, we are happy to announce ready-to-use Docker images for Dart. This expands our Docker usage further beyond the recently announced Docker support in Google App Engine. There are now three Dart-related images on hub.docker.com for you to use: dart, dart-runtime and dart-hello, which uses the same naming scheme as the corresponding Node, Python and Go images already offered.

The image google/dart adds the Dart SDK to google/debian Debian wheezy image. Running Dart in a container is now as simple as this:

  $ docker run -i -t google/dart /usr/bin/dart --version

The image google/dart-runtime inherits from google/dart, and provides a convenient way to run a Dart server application using a one line Dockerfile. To inherit from google/dart-runtime, your server application requires the following layout:

  • has a the pubspec.yaml and pubspec.lock files listing its dependencies.
  • has a file bin/server.dart as the entrypoint script.
  • listens on port 8080

With this layout and a Dockerfile with the following content:

FROM google/dart-runtime

You can run your app in a container as simple as this:

  $ docker build -t my-app .
  $ docker run -d -p 8080:8080 my-app

The last image google/dart-hello is a sample Dart server application, that inherits from dart/runtime. Here is an example of how to run the sample:

  $ docker run -d -p 8080:8080 google/dart-hello

Depending on your local Docker installation the address of the server differs. If you are using boot2docker with the default configuration you can talk to the Dart server in the docker container on http://192.168.59.103:8080:

  $ curl http://192.168.59.103:8080/version

You can choose specific version tags, such as 1.6.0 (recommended), or choose the ‘latest’ tag for the latest stable version. Here is an example of running Dart 1.6 with Docker:

  $ docker run -i -t google/dart:1.6.0 /usr/bin/dart --version

If you havent already, go and install boot2docker and start building you Dart server application using Docker images. Pushing these images to you server will simplify deployment and ensure you are running the same code on your server as you have been testing locally.

Posted by Mano Marks, Google Developer Platform Team
Read More..