Showing posts with label Android App. Show all posts

Because its gotta be super easy to find your files

| 0 comments |


(Cross-posted on the Google Drive Blog.)

When you store important files in Google Drive they’re not only safe, they’re accessible from any device. And finding them again from any device should be super easy so we’re rolling out a new search experience to get you better results — even faster.

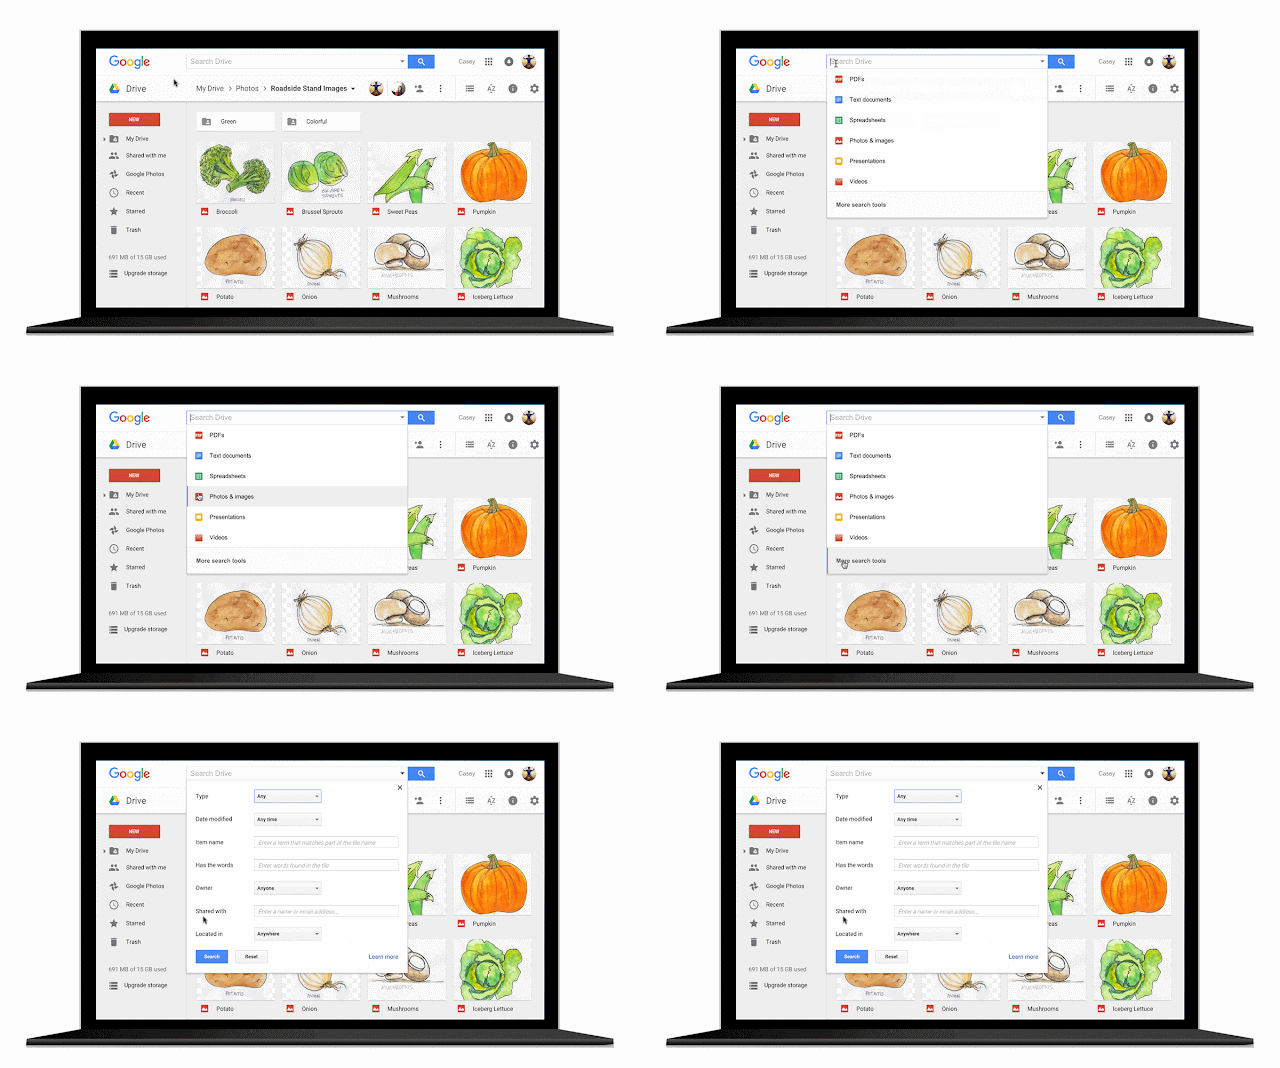
Drive lets you search across all your files, regardless of the device they came from. To make that easier, you can use these new ways to find your files:
  • Narrow your search to a file type from the search box on Android, iOS, and the web.
  • Open advanced search instantly from the search box.
  • Access recent files or search Drive from the home screen using 3D Touch on iOS.
  • Search Drive using the iOS search bar without opening the Drive app.
Several behind-the-scenes improvements give your search queries even better results than they did before. And to get more specific results, anyone can now do the following:
  • Search for shared files by file owner using their name or email address.
  • Use advanced search options like the date a file was modified, words it contains, or who it was shared with.
This is all part of an ongoing effort to make Drive the easiest place to find your files. Look for these features as they roll out in the coming weeks.
Read More..

Marmalade SDK Exception cannot open file iwui style style group bin for serialising

| 0 comments |
I made a simple IW2D app with Marmalade SDK, it worked fine in the Windows emulator but when I deployed to Android I received this exception:

cannot open file iwui_style/style.group.bin for serialising (read), Did you include this file in your mkb assets block

The solution was  to add this block to my MKB file

assets
{
(data-ram/data-gles1)
ui.group.bin
(data-ram/data-gles1)
iwui_style/style.group.bin

}
Read More..

Angular 1 and Angular 2 integration the path to seamless upgrade

| 0 comments |

Originally posted on the Angular blog.

Posted by, Misko Hevery, Software Engineer, Angular

Have an existing Angular 1 application and are wondering about upgrading to Angular 2? Well, read on and learn about our plans to support incremental upgrades.

Summary

Good news!

    • Were enabling mixing of Angular 1 and Angular 2 in the same application.
    • You can mix Angular 1 and Angular 2 components in the same view.
    • Angular 1 and Angular 2 can inject services across frameworks.
    • Data binding works across frameworks.

Why Upgrade?

Angular 2 provides many benefits over Angular 1 including dramatically better performance, more powerful templating, lazy loading, simpler APIs, easier debugging, even more testable and much more. Here are a few of the highlights:

Better performance

Weve focused across many scenarios to make your apps snappy. 3x to 5x faster on initial render and re-render scenarios.

    • Faster change detection through monomorphic JS calls
    • Template precompilation and reuse
    • View caching
    • Lower memory usage / VM pressure
    • Linear (blindingly-fast) scalability with observable or immutable data structures
    • Dependency injection supports incremental loading

More powerful templating

    • Removes need for many directives
    • Statically analyzable - future tools and IDEs can discover errors at development time instead of run time
    • Allows template writers to determine binding usage rather than hard-wiring in the directive definition

Future possibilities

Weve decoupled Angular 2s rendering from the DOM. We are actively working on supporting the following other capabilities that this decoupling enables:

    • Server-side rendering. Enables blinding-fast initial render and web-crawler support.
    • Web Workers. Move your app and most of Angular to a Web Worker thread to keep the UI smooth and responsive at all times.
    • Native mobile UI. Were enthusiastic about supporting the Web Platform in mobile apps. At the same time, some teams want to deliver fully native UIs on their iOS and Android mobile apps.
    • Compile as build step. Angular apps parse and compile their HTML templates. Were working to speed up initial rendering by moving the compile step into your build process.

Angular 1 and 2 running together

Angular 2 offers dramatic advantages over Angular 1 in performance, simplicity, and flexibility. Were making it easy for you to take advantage of these benefits in your existing Angular 1 applications by letting you seamlessly mix in components and services from Angular 2 into a single app. By doing so, youll be able to upgrade an application one service or component at a time over many small commits.

For example, you may have an app that looks something like the diagram below. To get your feet wet with Angular 2, you decide to upgrade the left nav to an Angular 2 component. Once youre more confident, you decide to take advantage of Angular 2s rendering speed for the scrolling area in your main content area.

For this to work, four things need to interoperate between Angular 1 and Angular 2:

    • Dependency injection
    • Component nesting
    • Transclusion
    • Change detection

To make all this possible, were building a library named ng-upgrade. Youll include ng-upgrade and Angular 2 in your existing Angular 1 app, and youll be able to mix and match at will.

You can find full details and pseudocode in the original upgrade design doc or read on for an overview of the details on how this works. In future posts, well walk through specific examples of upgrading Angular 1 code to Angular 2.

Dependency Injection

First, we need to solve for communication between parts of your application. In Angular, the most common pattern for calling another class or function is through dependency injection. Angular 1 has a single root injector, while Angular 2 has a hierarchical injector. Upgrading services one at a time implies that the two injectors need to be able to provide instances from each other.

The ng-upgrade library will automatically make all of the Angular 1 injectables available in Angular 2. This means that your Angular 1 application services can now be injected anywhere in Angular 2 components or services.

Exposing an Angular 2 service into an Angular 1 injector will also be supported, but will require that you to provide a simple mapping configuration.

The result is that services can be easily moved one at a time from Angular 1 to Angular 2 over independent commits and communicate in a mixed-environment.

Component Nesting and Transclusion

In both versions of Angular, we define a component as a directive which has its own template. For incremental migration, youll need to be able to migrate these components one at a time. This means that ng-upgrade needs to enable components from each framework to nest within each other.

To solve this, ng-upgrade will allow you to wrap Angular 1 components in a facade so that they can be used in an Angular 2 component. Conversely, you can wrap Angular 2 components to be used in Angular 1. This will fully work with transclusion in Angular 1 and its analog of content-projection in Angular 2.

In this nested-component world, each template is fully owned by either Angular 1 or Angular 2 and will fully follow its syntax and semantics. This is not an emulation mode which mostly looks like the other, but an actual execution in each framework, dependending on the type of component. This means that components which are upgraded to Angular 2 will get all of the benefits of Angular 2, and not just better syntax.

This also means that an Angular 1 component will always use Angular 1 Dependency Injection, even when used in an Angular 2 template, and an Angular 2 component will always use Angular 2 Dependency Injection, even when used in an Angular 1 template.

Change Detection

Mixing Angular 1 and Angular 2 components implies that Angular 1 scopes and Angular 2 components are interleaved. For this reason, ng-upgrade will make sure that the change detection (Scope digest in Angular 1 and Change Detectors in Angular 2) are interleaved in the same way to maintain a predictable evaluation order of expressions.

ng-upgrade takes this into account and bridges the scope digest from Angular 1 and change detection in Angular 2 in a way that creates a single cohesive digest cycle spanning both frameworks.

Typical application upgrade process

Here is an example of what an Angular 1 project upgrade to Angular 2 may look like.

  1. Include the Angular 2 and ng-upgrade libraries with your existing application
  2. Pick a component which you would like to migrate
    1. Edit an Angular 1 directives template to conform to Angular 2 syntax
    2. Convert the directives controller/linking function into Angular 2 syntax/semantics
    3. Use ng-upgrade to export the directive (now a Component) as an Angular 1 component (this is needed if you wish to call the new Angular 2 component from an Angular 1 template)
  3. Pick a service which you would would like to migrate
    1. Most services should require minimal to no change.
    2. Configure the service in Angular 2
    3. (optionally) re-export the service into Angular 1 using ng-upgrade if its still used by other parts of your Angular 1 code.
  4. Repeat doing step #2 and #3 in order convenient for your application
  5. Once no more services/components need to be converted drop the top level Angular 1 bootstrap and replace with Angular 2 bootstrap.

Note that each individual change can be checked in separately and the application continues working letting you continue to release updates as you wish.

We are not planning on adding support for allowing non-component directives to be usable on both sides. We think most of the non-component directives are not needed in Angular 2 as they are supported directly by the new template syntax (i.e. ng-click vs (click) )

Q&A

I heard Angular 2 doesnt support 2-way bindings. How will I replace them?

Actually, Angular 2 supports two way data binding and ng-model, though with slightly different syntax.

When we set out to build Angular 2 we wanted to fix issues with the Angular digest cycle. To solve this we chose to create a unidirectional data-flow for change detection. At first it was not clear to us how the two way forms data-binding of ng-model in Angular 1 fits in, but we always knew that we had to make forms in Angular 2 as simple as forms in Angular 1.

After a few iterations we managed to fix what was broken with multiple digests and still retain the power and simplicity of ng-model in Angular 1.

Two way data-binding has a new syntax: [(property-name)]="expression" to make it explicit that the expression is bound in both directions. Because for most scenarios this is just a small syntactic change we expect easy migration.

As an example, if in Angular 1 you have: <input type="text" ng-model="model.name" />

You would convert to this in Angular 2: <input type="text" [(ng-model)]="model.name" />

What languages can I use with Angular 2?

Angular 2 APIs fully support coding in todays JavaScript (ES5), the next version of JavaScript (ES6 or ES2015), TypeScript, and Dart.

While its a perfectly fine choice to continue with todays JavaScript, wed like to recommend that you explore ES6 and TypeScript (which is a superset of ES6) as they provide dramatic improvements to your productivity.

ES6 provides much improved syntax and intraoperative standards for common libraries like promises and modules. TypeScript gives you dramatically better code navigation, automated refactoring in IDEs, documentation, finding errors, and more.

Both ES6 and TypeScript are easy to adopt as they are supersets of todays ES5. This means that all your existing code is valid and you can add their features a little at a time.

What should I do with $watch in our codebase?

tldr; $watch expressions need to be moved into declarative annotations. Those that dont fit there should take advantage of observables (reactive programing style).

In order to gain speed and predictability, in Angular 2 you specify watch expressions declaratively. The expressions are either in HTML templates and are auto-watched (no work for you), or have to be declaratively listed in the directive annotation.

One additional benefit from this is that Angular 2 applications can be safely minified/obfuscated for smaller payload.

For interapplication communication Angular 2 offers observables (reactive programing style).

What can I do today to prepare myself for the migration?

Follow the best practices and build your application using components and services in Angular 1 as described in the AngularJS Style Guide.

Wasnt the original upgrade plan to use the new Component Router?

The upgrade plan that we announced at ng-conf 2015 was based on upgrading a whole view at a time and having the Component Router handle communication between the two versions of Angular.

The feedback we received was that while yes, this was incremental, it wasnt incremental enough. We went back and redesigned for the plan as described above.

Are there more details you can share?

Yes! In the Angular 1 to Angular 2 Upgrade Strategy design doc.

Were working on a series of upcoming posts on related topics including:

  1. Mapping your Angular 1 knowledge to Angular 2.
  2. A set of FAQs on details around Angular 2.
  3. Detailed migration guide with working code samples.

See you back here soon!
Read More..

Episode 15 Location Location Location

| 0 comments |
Tor and Chet are joined in this podcast episode by Marc Stogaitis, the lead of the Android location client team. Join us to hear the exciting and mysterious term "urban canyon" and also about the three most important things in location services: location, location, location.

Subscribe to the podcast feed or download the audio file directly.

Relevant Links:
Fused Location Provider API: https://developer.android.com/reference/com/google/android/gms/location/FusedLocationProviderApi.html
Geofencing API: https://developer.android.com/reference/com/google/android/gms/location/GeofencingApi.html
Activity Recognition API: https://developer.android.com/reference/com/google/android/gms/location/ActivityRecognitionApi.html
Beyond the Blue Dot (Google I/O 2013): https://developers.google.com/events/io/sessions/325337477

Location History dashboard: https://maps.google.com/locationhistory/

Marc: https://plus.google.com/107675566661349240635/posts
Tor: google.com/+TorNorbye
Chet: google.com/+ChetHaase

Read More..

Episode 24 Roman Holiday

| 0 comments |
Tor and Chet are joined by Roman Nurik from the Android Developer Relations team. We talk about Asset Studio to the Muzei wallpaper to Material Design to Android Studio application templates to watchfaces to icons to the Google I/O scheduling app to Android application design to the FORM conference. I guess hes been busy.

Subscribe to the podcast feed or download the audio file directly.

Relevant Links:

Dashclock: https://play.google.com/store/apps/details?id=net.nurik.roman.dashclock
DashClock Code: https://code.google.com/p/dashclock/
Muzei: https://play.google.com/store/apps/details?id=net.nurik.roman.muzei
Muzei Code: https://github.com/romannurik/muzei
Android Asset Studio: http://romannurik.github.io/AndroidAssetStudio/
Android Design Preview: https://github.com/romannurik/AndroidDesignPreview
Android Wear Watchfaces: https://developer.android.com/training/wearables/watch-faces/index.html
FORM: http://www.google.com/design/form/
Google I/O App: https://play.google.com/store/apps/details?id=com.google.samples.apps.iosched
Google I/O App Code: https://github.com/google/iosched
Material Design: http://www.google.com/design/spec/material-design/introduction.html

Roman: google.com/+RomanNurik
Tor: google.com/+TorNorbye
Chet: google.com/+ChetHaase

Read More..

Create DialogFragment with AlertDialog Builder

| 0 comments |

Last post show a example of DialogFragment, to create dialog view in onCreateView(). This example show how to create Dialog using AlertDialog.Builder() in onCreateDialog().


MainActivity.java
package com.blogspot.android_er.androiddialogfragment;

import android.app.AlertDialog;
import android.app.Dialog;
import android.app.DialogFragment;
import android.app.Fragment;
import android.app.FragmentTransaction;
import android.content.DialogInterface;
import android.os.Bundle;
import android.support.v7.app.AppCompatActivity;
import android.view.View;
import android.widget.Button;
import android.widget.EditText;
import android.widget.Toast;

public class MainActivity extends AppCompatActivity {

EditText inputTextField;

@Override
protected void onCreate(Bundle savedInstanceState) {
super.onCreate(savedInstanceState);
setContentView(R.layout.activity_main);

inputTextField = (EditText)findViewById(R.id.inputtext);
Button btnOpen = (Button)findViewById(R.id.opendialog);
btnOpen.setOnClickListener(new View.OnClickListener() {
@Override
public void onClick(View v) {
showDialog();
}
});
}

void showDialog() {
FragmentTransaction ft = getFragmentManager().beginTransaction();
Fragment prev = getFragmentManager().findFragmentByTag("dialog");
if (prev != null) {
ft.remove(prev);
}
ft.addToBackStack(null);

String inputText = inputTextField.getText().toString();

DialogFragment newFragment = MyDialogFragment.newInstance(inputText);
newFragment.show(ft, "dialog");

}

public static class MyDialogFragment extends DialogFragment {

String mText;

static MyDialogFragment newInstance(String text) {
MyDialogFragment f = new MyDialogFragment();

Bundle args = new Bundle();
args.putString("text", text);
f.setArguments(args);

return f;
}

@Override
public Dialog onCreateDialog(Bundle savedInstanceState) {
mText = getArguments().getString("text");

return new AlertDialog.Builder(getActivity())
.setIcon(R.mipmap.ic_launcher)
.setTitle("Alert Dialog")
.setMessage(mText)
.setPositiveButton("OK",
new DialogInterface.OnClickListener() {
public void onClick(DialogInterface dialog, int whichButton) {
Toast.makeText(getActivity(), "OK", Toast.LENGTH_LONG).show();
}
}
)
.setNegativeButton("Cancel", null)
.create();
}

}
}


layout/activity_main.xml
<?xml version="1.0" encoding="utf-8"?>
<LinearLayout


android_layout_width="match_parent"
android_layout_height="match_parent"
android_padding="16dp"
android_orientation="vertical"
tools_context=".MainActivity"
android_background="#808080">

<TextView
android_layout_width="wrap_content"
android_layout_height="wrap_content"
android_layout_gravity="center_horizontal"
android_autoLink="web"
android_text="http://android-er.blogspot.com/"
android_textStyle="bold" />

<EditText
android_id="@+id/inputtext"
android_layout_width="match_parent"
android_layout_height="wrap_content"
android_hint="Type something"/>
<Button
android_id="@+id/opendialog"
android_layout_width="match_parent"
android_layout_height="wrap_content"
android_text="Open DialogFragment"
android_textAllCaps="false"/>
</LinearLayout>


Next:
- Implement interactive DialogFragment

Read More..

3 2 1 Code in Inviting teens to contribute to open source

| 0 comments |

Code-in 2014 logo

We believe that the key to getting students excited about computer science is to give them opportunities at ever younger ages to explore their creativity with computer science. That’s why we’re running the Google Code-in contest again this year, and today’s the day students can go to the contest site, register and start looking for tasks that interest them.


Ignacio Rodriguez was just 10 years old when he became curious about Sugar, the open source learning platform introduced nationally to students in Uruguay when he was in elementary school. With the encouragement of his teacher, Ignacio started asking questions of the developers writing and maintaining the code and he started playing around with things, a great way to learn to code. When he turned 14 he entered the Google Code-in contest completing tasks that included writing two new web services for Sugar and he created four new Sugar activities. He even continued to mentor other students throughout the contest period.  His enthusiasm for coding and making the software even better for future users earned him a spot as a 2013 Grand Prize Winner.


Ignacio is one of the 1,575 students from 78 countries that have participated in Google Code-in since 2010. We are encouraging 13-17 year old students to explore the many varied ways they can contribute to open source software development through the Google Code-in contest. Because open source is a collaborative effort, the contest is designed as a streamlined entry point for students into software development by having mentors assigned to each task that a student works on during the contest. Students don’t have to be coders to participate; as with any software project, there are many ways to contribute to the project.  Students will be able to choose from documentation, outreach, research, training, user interface and quality assurance tasks in addition to coding tasks.


This year, students can choose tasks created by 12 open source organizations working on
disaster relief, content management, desktop environments, gaming, medical record systems for developing countries, 3D solid modeling computer-aided design and operating systems to name a few.  


For more information on the contest, please visit the contest site where you can find the timeline, Frequently Asked Questions and information on each of the open source projects students can work with during the seven week contest.


Good luck students!

By Stephanie Taylor, Open Source Programs
Read More..

Chrome Dev Summit 2015 That’s a wrap!

| 0 comments |

Originally posted on Chromium Blog

Posted by Darin Fisher, VP Engineering, Chrome

The last sessions of the Chrome Dev Summit 2015 are coming to a close, so it’s the perfect time to reflect on the event. We started our annual summit back in 2012, where we first introduced Chrome on Android. Today, there are more than 800 million monthly active users on Chrome for Android.

The greatest power of the Web is in its reach—not just across devices and operating systems, but in reaching users. Top mobile web properties are seeing 2.5 times the number of monthly unique visitors compared to the top mobile apps, and mobile web reach is growing at more than twice the rate of mobile app reach. This reach offers a unique opportunity to engage with more users.  

We believe this is a pivotal moment for the web platform, as early adopters of a set of key enabling technologies and tools are seeing success. During the keynote, we covered the evolution of the mobile platform and the shift towards “progressive web apps,” which are fast, robust, app-like experiences built using modern web capabilities. The web has come a long way, and building immersive apps with web technology on mobile no longer requires giving up properties of the web you’ve come to love. Flipkart’s new mobile web experience is a great example of a progressive web app that uses the new capabilities to provide a next-generation user experience.


In practice, progressive web apps have three main aspects that separate them from traditional websites: reliability, performance, and engagement.

Reliability
Every web app should load quickly, regardless of whether a user is connected to fast Wi-Fi, a 2G cell network, or no connection at all. We envision service workers as the ideal way for developers to build web apps that are resilient despite changing and unreliable networks. Weve released two libraries to help take the work out of writing your own service worker: sw-precache and sw-toolbox for your App Shell and dynamic content, respectively. Once your implementation is up and running, you can easily test it on different network connections using Chrome DevTools and WebPageTest. Service workers are already seeing great adoption by developers: there are currently 2.2 billion page loads a day using service workers, not counting its use in the New Tab page in Chrome.

Performance
The RAIL performance model helps you figure out what a user expects from each interaction with your site or app, breaking down performance into four key goals: 
  • Responses (tap to response) should be less than 100ms 
  • Animations (scrolling, gestures, and transitions) should run at 60 frames per second
  • Idle time should be used to opportunistically schedule non-essential work in 50ms chunks
  • Loading should be finished in under 1 second

In practice, weve found improving even just one area of RAIL performance can make a dramatic difference on the user experience. For example, a one second difference in loading time can have as much as an 11% impact on overall page views and a 16% impact on customer satisfaction.

Engagement
Traditionally, users have had a hard time re-engaging with sites on the web. Push notifications enable you to build experiences that users can engage with "outside of the tab"--they don’t need to have the browser open, or even be actively using your web app, in order to engage with your experience. Best of all, these notifications appear just like other app notifications. Currently we’re seeing over 350 million push notifications sent every day in Chrome, and it’s growing quickly. Beyond the Rack has found that users arriving to their site by push notifications browse 72% longer than average users and spend 26% more.

Tools for Success
Finally, Google is committed to making web developers successful. As our generalized library for building components on the web, Polymer is also deeply focused on helping developers achieve RAIL. Since its 1.0 release at Google I/O earlier this year, it has grown to be used on over 1 million web pages, including more than 300 projects within Google. Polymer 1.0 was 3 to 4 times faster than the previous 0.5 version, and the latest 1.2 release is even 20% faster than that. To get started with this modern way of thinking about web development, take a quick tour of Polymer, watch the Polymer Summit talks, check out the Polymer codelabs, or try the Polymer Starter Kit.

We already have great resources like Web Fundamentals that we continue to expand and improve.  We’re also committed to documenting each new feature we ship on the Mozilla Developer Network. In the past year alone, we’ve made 2,800 individual edits to MDN and created 212 new pages. To further our commitment to educating web developers, we’ve partnered with Udacity to offer a senior web nanodegree, an education credential focused on modern web technologies and techniques like service workers, Promises, HTTP/2 and more.

For all the details on Chrome Dev Summit 2015, you can watch full session videos, which we will continue to upload as they’re ready. Thanks for coming, thanks for watching, and most of all, thank you for developing for the web!
Read More..

Display OptionsMenu in FragmentActivity

| 0 comments |

I tried to display options menu in FragmentActivity, and run on Android 5, but the option menu doesnt shown!

My case is:
Min Sdk Version: API 16: Android 4.1 (Jelly Bean)
Target Sdk Version: API 23; Android 6.0 (Marshmallow)
Compile Sdk Version: API 23: Android 6.0 (Marshmallow)
Build Tools Version: 23.0.1

values/styles.xml
<resources>

<!-- Base application theme. -->
<style name="AppTheme" parent="Theme.AppCompat.Light.DarkActionBar">
<!-- Customize your theme here. -->
<item name="colorPrimary">@color/colorPrimary</item>
<item name="colorPrimaryDark">@color/colorPrimaryDark</item>
<item name="colorAccent">@color/colorAccent</item>
</style>

</resources>


menu/activity_main.xml
<?xml version="1.0" encoding="utf-8"?>
<menu
>
<item
android_id="@+id/option1"
android_orderInCategory="100"
app_showAsAction="always"
android_title="Option 1"/>
<item
android_id="@+id/option2"
android_orderInCategory="100"
android_title="Option 2"/>
<item
android_id="@+id/option3"
android_orderInCategory="100"
android_title="Option 3"/>
</menu>

MainActivity.java
package com.blogspot.android_er.testfragmentactivity;

import android.os.Bundle;
import android.support.v4.app.FragmentActivity;
import android.view.Menu;
import android.view.MenuItem;
import android.widget.Toast;

public class MainActivity extends FragmentActivity {

@Override
protected void onCreate(Bundle savedInstanceState) {
super.onCreate(savedInstanceState);
setContentView(R.layout.activity_main);
}

@Override
public boolean onCreateOptionsMenu(Menu menu) {
getMenuInflater().inflate(R.menu.activity_main, menu);
return super.onCreateOptionsMenu(menu);
}

@Override
public boolean onOptionsItemSelected(MenuItem item) {
switch(item.getItemId()){
case R.id.option1:
Toast.makeText(MainActivity.this, "Option 1", Toast.LENGTH_LONG).show();
return true;
case R.id.option2:
Toast.makeText(MainActivity.this, "Option 2", Toast.LENGTH_LONG).show();
return true;
case R.id.option3:
Toast.makeText(MainActivity.this, "Option 3", Toast.LENGTH_LONG).show();
return true;
}
return super.onOptionsItemSelected(item);
}
}


To fix it:

(approach 1)
Edit MainActivity.java, extends ActionBarActivity (deprecated) or AppCompatActivity, instead of FragmentActivity.

Refer to the document of FragmentActivity, If you want to implement an activity that includes an action bar, you should instead use the ActionBarActivity class, which is a subclass of this one, so allows you to use Fragment APIs on API level 7 and higher.

And, ActionBarActivity is deprecated, so you should use AppCompatActivity instead.

(approach 2)
Alternatively, edit values/styles.xml, set parent of <style> to "android:Theme.Holo.Light" or "android:Theme.Holo.Light.DarkActionBar", instead of "Theme.AppCompat.Light.DarkActionBar".

This video show how to and demo on Android Emulator running Android 4.1 Jelly Bean with API 16 and Android 6.0 Marshmallow with API 23.


Read More..

Celebrating 30 years of COM and the future of DOMAINS

| 0 comments |


(Cross-posted on the Official Google Blog.)

When you visited Google today, we’re pretty sure you didn’t type 173.194.113.18 into your browser. This string of numbers separated by periods—an IP address—isn’t nearly as easy or memorable as typing google.com. Domain names ending in things like .COM, .NET and .EDU make browsing the web and telling people where to find you online easier. Since this month marks the 30-year anniversary of .COM and several other domain endings, we’re taking a minute to celebrate these often-overlooked suffixes that have changed the way we use the web.
Though they were introduced in 1985, domain names didn’t gain much awareness and use amongst the public until the World Wide Web became available to all during the ‘90s and it became clear they were an important part in unlocking its power. Using these online addresses, people began to spread messages, start businesses and access information that otherwise would have been nearly impossible to find. Popularity and demand for these names grew so much that people were soon willing to pay millions of dollars for the perfect one.
Today there are 270+ million registered domain names; in fact, about 17 million were added just last year. To create more naming options for people online, hundreds of new top-level domains are being added, and many, like .TODAY, .NINJA and .BIKE are already available. We wrote about this back in 2012, and since then we’ve launched three of our own: .HOW, .SOY and .???.
As .COM turns 30, we’re looking back on the history of domain endings and all they’ve made possible. Today there are more choices than ever before for people to find the perfect name for their businesses, projects and ideas on the web. If you’re interested in learning more about this history, or you’d like to register your own piece of the web, head over to Google Domains to claim your .DOMAINS from a .COM to a .GURU.
Here’s to .COM’s 30th, and all that’s yet to come in how we name destinations on the Internet.

Read More..

Updated Material Design Guidelines and Resources

| 0 comments |

When we first published the Material Design guidelines back in June, we set out to create a living document that would grow with feedback from the community. In that time, we’ve seen some great work from the community in augmenting the guidelines with things like Sketch templates, icon downloads and screens upon screens of inspiring visual and motion design ideas. We’ve also received a lot of feedback around what resources we can provide to make using Material Design in your projects easier.

So today, in addition to publishing the final Android 5.0 SDK for developers, we’re publishing our first significant update to the Material Design guidelines, with additional resources including:

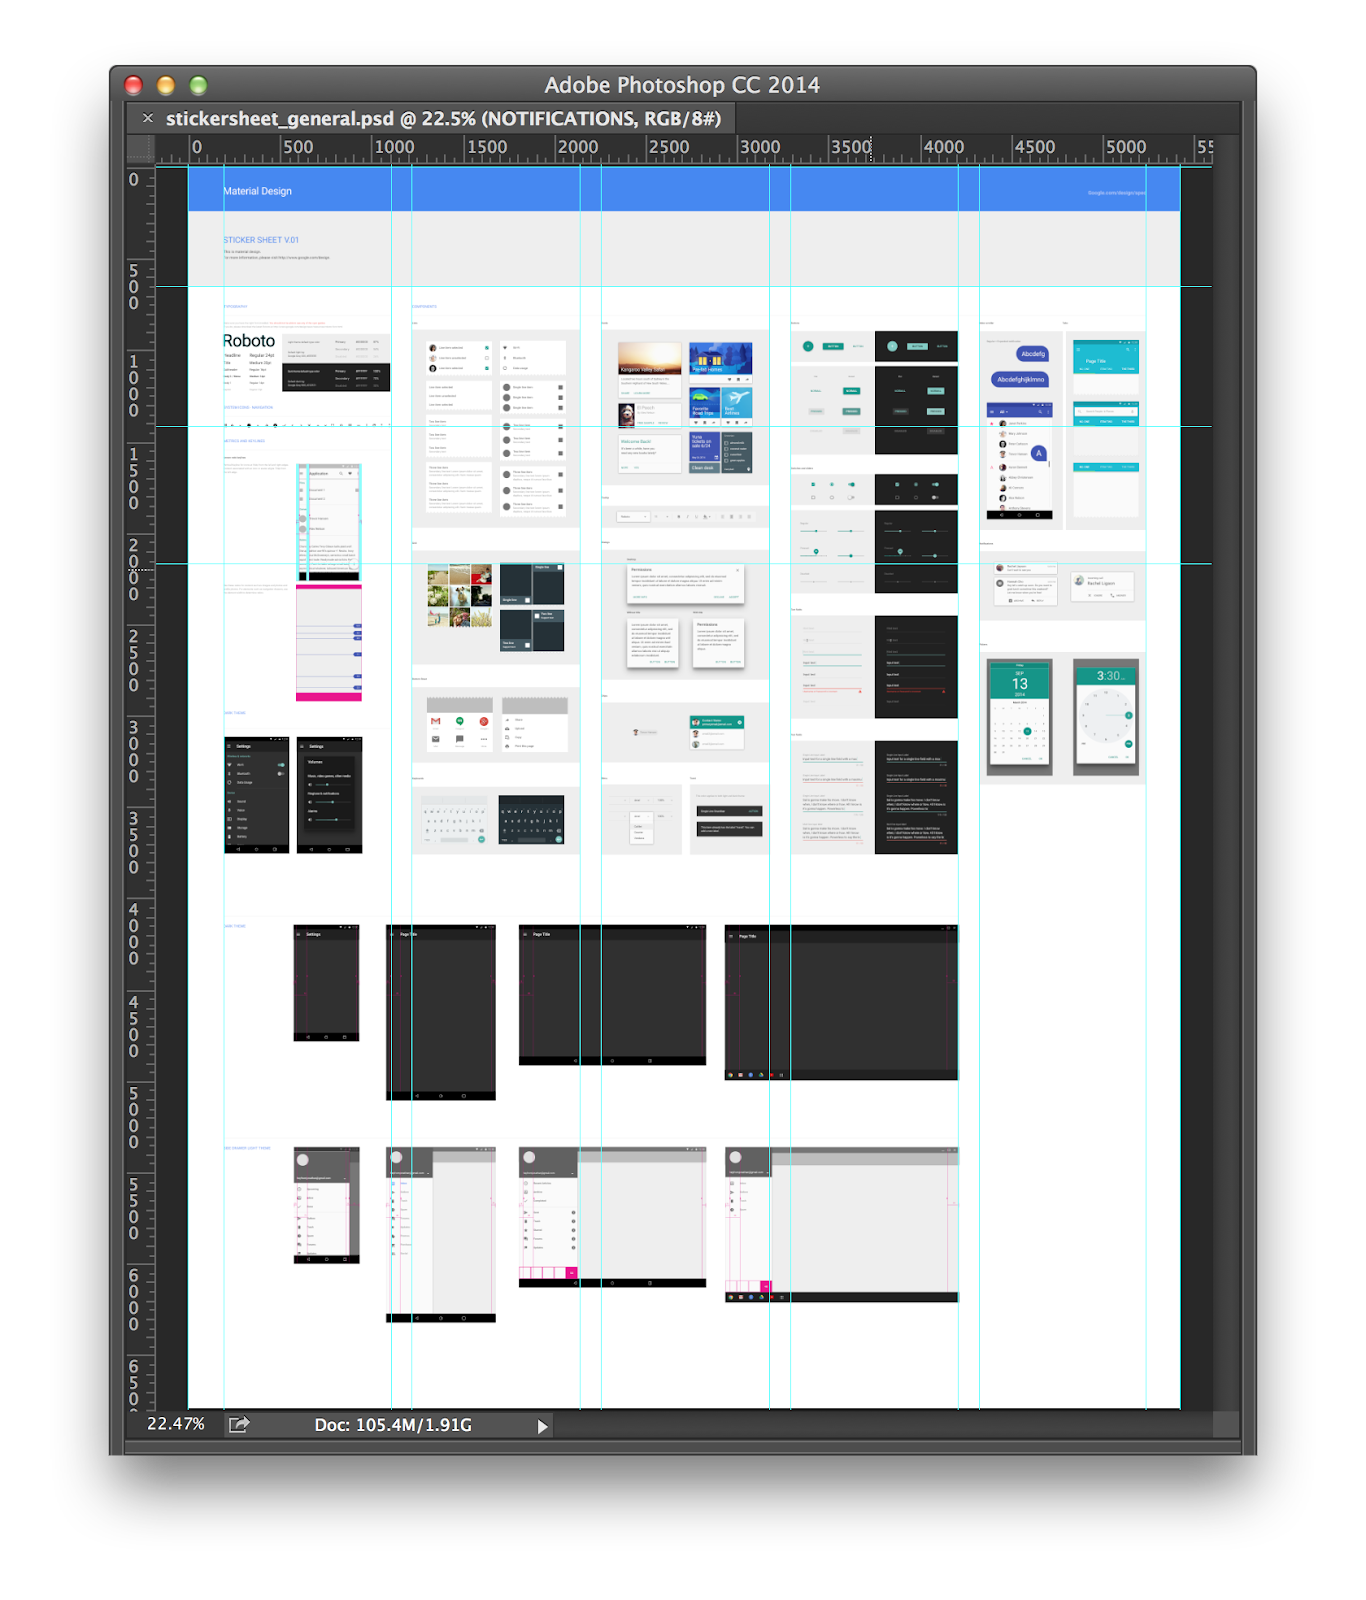
  • Updated sticker sheets in PSD, AI and Sketch formats
  • A new icon library ZIP download
  • Updated color swatch downloads
  • Updated whiteframe downloads, including better baseline grid text alignment and other miscellaneous fixes

The sticker sheets have been updated to reflect the latest refinements to the components and integrated into a single, comprehensive sticker sheet that should be easier to use. An aggregated sticker sheet is also newly available for Adobe Photoshop and Sketch—two hugely popular requests. In the sticker sheet, you can find various elements that make up layouts, including light and dark symbols for the status bar, app bar, bottom toolbar, cards, dropdowns, search fields, dividers, navigation drawers, dialogs, the floating action button, and other components. The sticker sheets now also include explanatory text for elements.

Note that the images in the Components section of the guidelines havent yet been updated (that’s coming soon!), so you can consider the sticker sheets to be the most up-to-date version of the components.

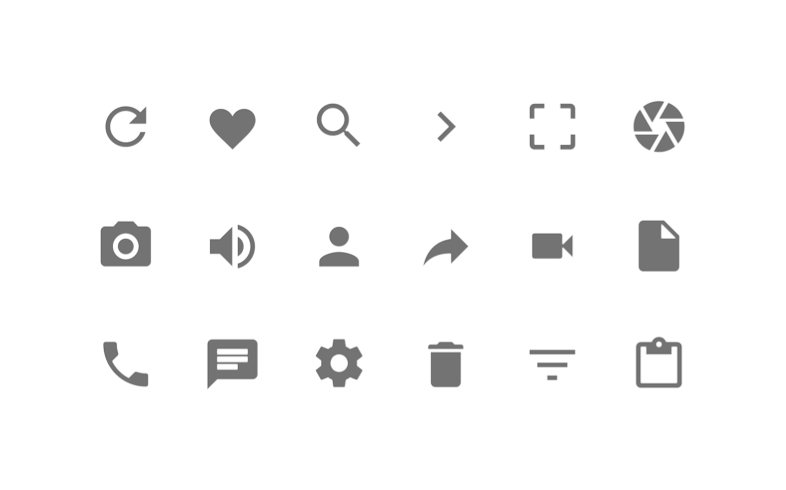
Also, the new system icons sticker sheet contains icons commonly used in Android across different apps, such as icons used for media playback, communication, content editing, connectivity, and so on.

Stay tuned for more enhancements as we incorporate more of your feedback—remember to share your suggestions on Google+! We’re excited to continue evolving this living document with you!

For more on Material Design, check out these videos and the new getting started guide for Android developers.

Posted by Roman Nurik, Design Advocate
Read More..

The Polymer Summit 2015 Roundup

| 0 comments |

Posted by Taylor Savage, Product Manager, Polymer

Yesterday in Amsterdam we kicked off the first ever Polymer Summit, joined live by 800 developers. We focused on three key themes: Develop, Design and Deploy, giving concrete advice on how you can build your web app from start to finish. You can watch a replay of the keynote here.


It has been amazing to see how much the community has grown and how far the project has come: what started as an experiment in a new way of developing on the web platform has steadily grown into the range of tools, product lines, and community contributions we saw presented throughout the Summit. Since Polymer 1.0 launched in May we’ve seen more than 150,000 public facing pages created with Polymer.

In case you missed any of the sessions, we’ve consolidated all of the recordings below:

Develop

  • Thinking in Polymer
  • End to End with Polymer
  • Using ES6 with Polymer
  • Testing Polymer Web Components
  • Platinum Elements
  • There’s an element for that - but what if there isn’t
  • A11y with Polymer
  • Upgrading to 1.0 with polyup
  • Polymers Gesture System

Design

  • Adaptive UI with Material Design and Paper Elements
  • Polymers Styling System
  • Polymers Animation System

Deploy

  • Polymer Power Tools
  • Polymer Performance Patterns
  • Doing a Perf Audit of your Polymer App

Be sure to visit our YouTube channel for the session recordings. For the latest news and upcoming Polymer events, subscribe to the Polymer blog and follow us on Twitter @Polymer.

Read More..

Lighting the way with BLE beacons

| 0 comments |

Posted by Chandu Thota, Engineering Director and Matthew Kulick, Product Manager

Just like lighthouses have helped sailors navigate the world for thousands of years, electronic beacons can be used to provide precise location and contextual cues within apps to help you navigate the world. For instance, a beacon can label a bus stop so your phone knows to have your ticket ready, or a museum app can provide background on the exhibit you’re standing in front of. Today, we’re beginning to roll out a new set of features to help developers build apps using this technology. This includes a new open format for Bluetooth low energy (BLE) beacons to communicate with people’s devices, a way for you to add this meaningful data to your apps and to Google services, as well as a way to manage your fleet of beacons efficiently.

Eddystone: an open BLE beacon format

Working closely with partners in the BLE beacon industry, we’ve learned a lot about the needs and the limitations of existing beacon technology. So we set out to build a new class of beacons that addresses real-life use-cases, cross-platform support, and security.

At the core of what it means to be a BLE beacon is the frame format—i.e., a language—that a beacon sends out into the world. Today, we’re expanding the range of use cases for beacon technology by publishing a new and open format for BLE beacons that anyone can use: Eddystone. Eddystone is robust and extensible: It supports multiple frame types for different use cases, and it supports versioning to make introducing new functionality easier. It’s cross-platform, capable of supporting Android, iOS or any platform that supports BLE beacons. And it’s available on GitHub under the open-source Apache v2.0 license, for everyone to use and help improve.

By design, a beacon is meant to be discoverable by any nearby Bluetooth Smart device, via its identifier which is a public signal. At the same time, privacy and security are really important, so we built in a feature called Ephemeral Identifiers (EIDs) which change frequently, and allow only authorized clients to decode them. EIDs will enable you to securely do things like find your luggage once you get off the plane or find your lost keys. We’ll publish the technical specs of this design soon.


Eddystone for developers: Better context for your apps

Eddystone offers two key developer benefits: better semantic context and precise location. To support these, we’re launching two new APIs. The Nearby API for Android and iOS makes it easier for apps to find and communicate with nearby devices and beacons, such as a specific bus stop or a particular art exhibit in a museum, providing better context. And the Proximity Beacon API lets developers associate semantic location (i.e., a place associated with a lat/long) and related data with beacons, stored in the cloud. This API will also be used in existing location APIs, such as the next version of the Places API.

Eddystone for beacon manufacturers: Single hardware for multiple platforms

Eddystone’s extensible frame formats allow hardware manufacturers to support multiple mobile platforms and application scenarios with a single piece of hardware. An existing BLE beacon can be made Eddystone compliant with a simple firmware update. At the core, we built Eddystone as an open and extensible protocol that’s also interoperable, so we’ll also introduce an Eddystone certification process in the near future by closely working with hardware manufacturing partners. We already have a number of partners that have built Eddystone-compliant beacons.

Eddystone for businesses: Secure and manage your beacon fleet with ease

As businesses move from validating their beacon-assisted apps to deploying beacons at scale in places like stadiums and transit stations, hardware installation and maintenance can be challenging: which beacons are working, broken, missing or displaced? So starting today, beacons that implement Eddystone’s telemetry frame (Eddystone-TLM) in combination with the Proximity Beacon API’s diagnostic endpoint can help deployers monitor their beacons’ battery health and displacement—common logistical challenges with low-cost beacon hardware.

Eddystone for Google products: New, improved user experiences

We’re also starting to improve Google’s own products and services with beacons. Google Maps launched beacon-based transit notifications in Portland earlier this year, to help people get faster access to real-time transit schedules for specific stations. And soon, Google Now will also be able to use this contextual information to help prioritize the most relevant cards, like showing you menu items when you’re inside a restaurant.

We want to make beacons useful even when a mobile app is not available; to that end, the Physical Web project will be using Eddystone beacons that broadcast URLs to help people interact with their surroundings.

Beacons are an important way to deliver better experiences for users of your apps, whether you choose to use Eddystone with your own products and services or as part of a broader Google solution like the Places API or Nearby API. The ecosystem of app developers and beacon manufacturers is important in pushing these technologies forward and the best ideas won’t come from just one company, so we encourage you to get some Eddystone-supported beacons today from our partners and begin building!

Update (July 16, 2015 11.30am PST) To clarify, beacons registered with proper place identifiers (as defined in our Places API) will be used in Place Picker. You have to use Proximity Beacon API to map a beacon to a place identifier. See the post on Googles Geo Developer Blog for more details.

Read More..

Convert ImageView to black and white and set brightness using ColorFilter

| 0 comments |


MainActivity.java
package com.blogspot.android_er.androidcolorfilter;

import android.graphics.ColorFilter;
import android.graphics.ColorMatrixColorFilter;
import android.graphics.PorterDuff;
import android.os.Bundle;
import android.support.v7.app.AppCompatActivity;
import android.widget.ImageView;
import android.widget.SeekBar;
import android.widget.TextView;

public class MainActivity extends AppCompatActivity {

ImageView imageView;
SeekBar brightnessBar;
TextView brightnessInfo;

PorterDuff.Mode[] optMode = PorterDuff.Mode.values();

@Override
protected void onCreate(Bundle savedInstanceState) {
super.onCreate(savedInstanceState);
setContentView(R.layout.activity_main);

imageView = (ImageView)findViewById(R.id.iv);
brightnessBar = (SeekBar)findViewById(R.id.bar_brightness);
brightnessInfo = (TextView)findViewById(R.id.brightness_info);

brightnessBar.setOnSeekBarChangeListener(brightnessBarChangeListener);

setBlackAndWhite(imageView);
}

SeekBar.OnSeekBarChangeListener brightnessBarChangeListener
= new SeekBar.OnSeekBarChangeListener(){

@Override
public void onProgressChanged(SeekBar seekBar, int progress, boolean fromUser) {
setBlackAndWhite(imageView);
}

@Override
public void onStartTrackingTouch(SeekBar seekBar) {

}

@Override
public void onStopTrackingTouch(SeekBar seekBar) {

}
};

private void setBlackAndWhite(ImageView iv){

float brightness = (float)(brightnessBar.getProgress() - 255);

float[] colorMatrix = {
0.33f, 0.33f, 0.33f, 0, brightness, //red
0.33f, 0.33f, 0.33f, 0, brightness, //green
0.33f, 0.33f, 0.33f, 0, brightness, //blue
0, 0, 0, 1, 0 //alpha
};

ColorFilter colorFilter = new ColorMatrixColorFilter(colorMatrix);
iv.setColorFilter(colorFilter);

brightnessInfo.setText(String.valueOf(brightness));
}

}


layout/activity_main.xml
<?xml version="1.0" encoding="utf-8"?>
<LinearLayout


android_layout_width="match_parent"
android_layout_height="match_parent"
android_padding="16dp"
android_orientation="vertical"
tools_context=".MainActivity">

<TextView
android_layout_width="wrap_content"
android_layout_height="wrap_content"
android_layout_gravity="center_horizontal"
android_autoLink="web"
android_text="http://android-er.blogspot.com/"
android_textStyle="bold" />

<ImageView
android_id="@+id/iv"
android_layout_width="wrap_content"
android_layout_height="wrap_content"
android_src="@mipmap/ic_launcher"/>

<TextView
android_layout_width="wrap_content"
android_layout_height="wrap_content"
android_text="Brightness"/>

<SeekBar
android_id="@+id/bar_brightness"
android_layout_width="match_parent"
android_layout_height="wrap_content"
android_max="512"
android_progress="255"/>

<TextView
android_id="@+id/brightness_info"
android_layout_width="wrap_content"
android_layout_height="wrap_content"
android_text="Brightness"/>
</LinearLayout>


Related:
- Android example code using ColorFilter

Read More..

Redefining what it means to go to school in New York

| 0 comments |

(Cross-posted on the Google for Education Blog.)

Editors note: New York is seeing great success with Google for Education. We talked to educators and administrators to reflect on how technology has changed what it means to teach and learn in New York. From group projects to collaborative lesson plans to online assessments, technology has improved the learning experience for students across the state. To learn more about Google’s solutions for Education, join the webinar with Amherst Central School District today at 2pm ET / 11am PT.

Learning isn’t just about listening to a lecture or reading a textbook. Similarly, educational transformation isn’t just about introducing technology. It’s about encouraging students to think differently, work together and make their education personal. Schools in New York are giving students more freedom and flexibility to learn and collaborate with the help of tools like Google Apps for Education, Chromebooks and Google Classroom. We’re highlighting a few ways New York schools are transforming their classrooms and benefiting from technology:


Enabling teachers to think outside the box


At Massapequa Public Schools (case study), teachers are providing students with a variety of learning resources, from articles and text-based guides to videos and audio content. For example, when students were studying Pythagorean theorem in math class, the teacher filmed a video showing students the math concept, a2 + b2 = c2, so they could reference the information from home. When students have access to digital learning materials at home, they’re able to learn anytime, anywhere.

With Google for Education, students have access to learning resources anytime, anywhere. Says Bob Schilling, executive director for assessment, student data and technology services at Massapequa Public Schools: “Students watch videos and access their teacher’s resources at home in order to be introduced to concepts, then spend class time applying those concepts in authentic experiences. That changes the value of a 40-minute class period.”


Getting moms and dads involved in education 


Amherst Central Schools (case study) wants parents to be a bigger part of their children’s learning and is using technology to get them more involved. With Google Apps for Education and Google Classroom, parents can see whether their child has started a project or needs a nudge. Students access their work wherever they are and can share progress with their families. For example, Jake, a third grader, shared his presentation about Canadian culture and history with his parents as he worked on the assignment so they could see what he was learning.

Teachers also create instructional videos to help parents take on the role of the teacher at home. While Michael Milliman, grade 5 math teacher at Smallwood Drive Elementary School, taught students a complex problem, parents could reference the 30-second video that Milliman created. “Learning is meant to be a social and collaborative process,” says Anthony Panella, assistant superintendent of curriculum and instruction at Amherst Central Schools. The district is helping extend the social aspect of learning to include parents.


Teaching students technology and teamwork skills for the future 


Rochester City School District’s (case study) main goal is to teach students skills that they can use during their education, in their careers and beyond. Many students don’t have access to technology at home, so Rochester City School District is teaching them how to use technology. And since students need to know how to work with others regardless of the line of work they pursue, teachers are also helping students learn teamwork by assigning group projects aided by collaboration tools. For example, fifth grade students collaborated in person with their peers on a biome project and provided feedback to their teammates using the chat and commenting features in Google Docs.

Schools continue to provide students with innovative online learning resources that help students learn more and teachers personalize education. Check out the schools’ stories and register for the webinar with Amherst Schools happening today to learn more.

We’ve heard great stories from many of you about how you’re using technology to do amazing things in your schools, so were going across the U.S. to see for ourselves! Check out the map below to see where we’ve been. We’d love to hear what’s happening in your state, so please share your story on Twitter or Google+ and tag us (@GoogleForEdu) or include the #GoogleEdu hashtag.


Read More..

List supported ABIs

| 0 comments |
Example list Android devices SUPPORTED_ABIS, SUPPORTED_32_BIT_ABIS and SUPPORTED_64_BIT_ABIS.

Run on Emulator with Intel x86_64

Run on device, Nexus 7, with 32-bit ARM CPU
MainActivity.java
package com.blogspot.android_er.androidsupportedabis;

import android.os.Build;
import android.support.v7.app.AppCompatActivity;
import android.os.Bundle;
import android.widget.TextView;

public class MainActivity extends AppCompatActivity {

@Override
protected void onCreate(Bundle savedInstanceState) {
super.onCreate(savedInstanceState);
setContentView(R.layout.activity_main);

TextView textSupportedABIs = (TextView)findViewById(R.id.supportedabis);

textSupportedABIs.setText("Build.SUPPORTED_ABIS: ");
String[] SUPPORTED_ABIS = Build.SUPPORTED_ABIS;
for(String abi : SUPPORTED_ABIS){
textSupportedABIs.append(abi + " ");
}
textSupportedABIs.append(" ");

textSupportedABIs.append("Build.SUPPORTED_32_BIT_ABIS: ");
String[] SUPPORTED_32_BIT_ABIS = Build.SUPPORTED_32_BIT_ABIS;
for(String abi32 : SUPPORTED_32_BIT_ABIS){
textSupportedABIs.append(abi32 + " ");
}
textSupportedABIs.append(" ");

textSupportedABIs.append("Build.SUPPORTED_64_BIT_ABIS: ");
String[] SUPPORTED_64_BIT_ABIS = Build.SUPPORTED_64_BIT_ABIS;
for(String abi64 : SUPPORTED_64_BIT_ABIS){
textSupportedABIs.append(abi64 + " ");
}
textSupportedABIs.append(" ");
}
}


<?xml version="1.0" encoding="utf-8"?>
<LinearLayout

android_layout_width="match_parent"
android_layout_height="match_parent"
android_padding="16dp"
android_orientation="vertical"
tools_context="com.blogspot.android_er.androidsupportedabis.MainActivity">

<TextView
android_layout_width="wrap_content"
android_layout_height="wrap_content"
android_layout_gravity="center_horizontal"
android_autoLink="web"
android_text="http://android-er.blogspot.com/"
android_textStyle="bold" />

<TextView
android_id="@+id/supportedabis"
android_layout_width="match_parent"
android_layout_height="wrap_content" />
</LinearLayout>


Related:
- Display ABI using "adb shell getprop ro.product.cpu.abi" command

Read More..

Cast Remote Display API Processing

| 0 comments |

Posted by Leon Nicholls, Developer Programs Engineer

Remote Display on Google Cast allows your app to display both on your mobile and Cast device at the same time. Processing is a programming language that allows artists and hobbyists to create advanced graphics and interactive exhibitions. By putting these two things together we were able to quickly create stunning visual art and display it on the big screen just by bringing our phone to the party or gallery. This article describes how we added support for the Google Cast Remote Display APIs to Processing for Android and how you can too.

An example app from the popular Processing toxiclibs library on Cast. Download the code and run it on your own Chromecast!

A little background

Processing has its own IDE and has many contributed libraries that hide the technical details of various input, output and rendering technologies. Users of Processing with just basic programming skills can create complicated graphical scenes and visualizations.

To write a program in the Processing IDE you create a “sketch” which involves adding code to life-cycle callbacks that initialize and draw the scene. You can run the sketch as a Java program on your desktop. You can also enable support for Processing for Android and then run the same sketch as an app on your Android mobile device. It also supports touch events and sensor data to interact with the generated apps.

Instead of just viewing the graphics on the small screen of the Android device, we can do better by projecting the graphics on a TV screen. Google Cast Remote Display APIs makes it easy to bring graphically intensive apps to Google Cast receivers by using the GPUs, CPUs and sensors available on the mobile devices you already have.

How we did it

Adding support for Remote Display involved modifying the Processing for Android Mode source code. To compile the Android Mode you first need to compile the source code of the Processing IDE. We started with the source code of the current stable release version 2.2.1 of the Processing IDE and compiled it using its Ant build script (detailed instructions are included along with the code download). We then downloaded the Android SDK and source code for the Android Mode 0232. After some minor changes to its build config to support the latest Android SDK version, we used Ant to build the Android Mode zip file. The zip file was unzipped into the Processing IDE modes directory.

We then used the IDE to open one of the Processing example sketches and exported it as an Android project. In the generated project we replaced the processing-core.jar library with the source code for Android Mode. We also added a Gradle build config to the project and then imported the project into Android Studio.

The main Activity for a Processing app is a descendent of the Android Mode PApplet class. The PApplet class uses a GLSurfaceView for rendering 2D and 3D graphics. We needed to change the code to use that same GLSurfaceView for the Remote Display API.

It is a requirement in the Google Cast Design Checklist for the Cast button to be visible on all screens. We changed PApplet to be an ActionBarActivity so that we can show the Cast button in the action bar. The Cast button was added by using a MediaRouteActionProvider. To only list Google Cast devices that support Remote Display, we used a MediaRouteSelector with an App ID we obtained from the Google Cast SDK Developer Console for a Remote Display Receiver.

Next, we created a class called PresentationService that extends CastRemoteDisplayLocalService. The service allows the app to keep the remote display running even when it goes into the background. The service requires a CastPresentation instance for displaying its content. The CastPresentation instance uses the GLSurfaceView from the PApplet class for its content view. However, setting the CastPresentation content view requires some changes to PApplet so that the GLSurfaceView isn’t initialized in its onCreate, but waits until the service onRemoteDisplaySessionStarted callback is invoked.

When the user selects a Cast device in the Cast button menu and the MediaRouter onRouteSelected event is called, the service is started with CastRemoteDisplayLocalService.startService. When the user disconnects from a Cast device using the Cast button, MediaRouter onRouteUnselected event is called and the service is stopped by using CastRemoteDisplayLocalService.stopService.

For the mobile display, we display an image bitmap and forward the PApplet touch events to the existing surfaceTouchEvent method. When you run the Android app, you can use touch gestures on the display of the mobile device to control the interaction on the TV. Take a look at this video of some of the Processing apps running on a Chromecast.

Most of the new code is contained in the PresentationService and RemoteDisplayHelper classes. Your mobile device needs to have at least Android KitKat and Google Play services version 7.5.71.

You can too

Now you can try the Remote Display APIs in your Processing apps. Instead of changing the generated code every time you export your Android Mode project, we recommend that you use our project as a base and simply copy your generated Android code and libraries to our project. Then simply modify the project build file and update the manifest to start the app with your sketch’s main Activity.

To see a more detailed description on how to use the Remote Display APIs, read our developer documentation. We are eager to see what Processing artists can do with this code in their projects.

Read More..

Lithium Sulfur battery cells the upcoming replacement for Lithium Ion

| 0 comments |

Lithium-ion batteries, the current battery technology used in smartphones, has a high specific energy (energy per weight) but has a few drawbacks. Lets take a closer look and compare both technologies.

The main issue with Li-ion is that is requires lithium dissolved in extremely volatile and flammable organic solvents; e.g. dimethoxyethane which has a low flash point -2 °C (28 °F), the temperature at which a volatile substance can evaporate and form an ignitable mixture in air. This makes them extremely dangerous when the charging circuits malfunction and fail to protect the battery from overcharging, and consequently overheating. We have seen some scary stories in the recent past with people waking up to their phone bursting into flames while they were charging overnight, and the battery fires in the new Boeing 787 Li-ion battery packs. So obviously there is need for development into a safer battery composition with similar or better energy capacities.

Recently I did some research into the developing Lithium-Sulfur battery, with extremely promising specifications at the present time better than Li-ion. Li-S is extremely light weight due to the use of sulfur instead of ionic liquids, additionally sulfur is much cheaper to produce than ionic liquids. Despite frequent headlines about new battery compositions with potentially high capacities, Li-S is actually in the production stages and no longer just a concept.  

The chemistry behind Li-S is essentially the lithium gets plated onto the anode when charging and poly-sulfides are reduced and coat the anode when discharging, compared to the use of intercalated anode and cathode plates in Li-ion. This is the main factor which gives Li-S potential to be a battery composition with an extremely high specific energy. The different chemistry also allows the use of much less volatile solvents such as polyethylene glycols (flash point up to 287 °C/548 °F).

The degradation of Li-S is different to Li-ion but is also susceptible to an increased rate of degradation at high temperatures. There are unwanted side reactions that can take place, but are reversible until they dissolve into the solvent. Luckily sulfide compounds are relatively insoluble in electrolyte solutions but any increase in temperature will increase their solubility, so batteries need to be well regulated to prevent rapid charging and discharging.

Manufacturers are beginning to pour money into research and development for Li-S as there are a lot of factors which can be significantly improved, from something as simple milling smaller sulfur and carbon particles to something more difficult like developing a better solvent to improve battery capacity and reduce degradation. (Carbon nanotubes/nanofibres are used as a conductor due to sulfur’s poor electroconductivity, and they are still quite expensive to produce.)

Ive put a graph at the top to compare rechargeable battery technology in the past with Li-S. Now, time to see which OEM will be implementing Li-S first.

TL;DR Lithium-Sulfur batteries are capable of having a higher wattage per weight than Lithium-ion whilst being both safer to the consumer and cheaper to manufacture.


Puncture test comparison


Short circuit test comparison

This article is also to be found on its authors personal blog.

Have any questions or comments? Feel free to share! Also, if you like this article, please use media sharing buttons (Twitter, G+, Facebook) below this post!
Read More..